HTTP is the way that we communicate over the internet. It’s what allows you to see the content you’re currently looking at. The overall goal with the project is to create a simple HTTP proxy server. It is not designed to be a framework with routing, or any other fancy features.
On top of that, there are a few caveats:
- It will only support parts of the HTTP 1.1 spec (just enough to work for basic use)
- It will only support a portion of the HTTP response codes
- It will not have optimizations like caching or multithreading
Terms & Concepts
To start there are some terms we need to understand in order to understand HTTP (this video is also pretty good). Here are some of the basics:
| Term | Description | Example |
|---|
| IP Address | This is what computers use to communicate with one another, it is similar to an actual address | 127.0.0.1 is the IP address reserved for the computer you’re currently on, so if you need to communicate with yourself you can (this is useful for testing) |
| Port | A computer can have multiple servers running on it. Each of these “servers” runs on a different port so you can communicate with them sparately | If you are running a server on your own machine and have it on port 8080 you can access it in a browser at http://localhost:8080 |
| Proxy/alias | In our context we’re using this to mean something that stands-in or is replaced by something else | For localhost is a proxy for 127.0.0.1 on your computer, so if you go to localhost it is the same as going to 127.0.0.1 |
| Host | The name of a computer (local/on the machine) | Let’s say you gave your PC the name thoth when you set it up, then on your own network you can access it at thoth or thoth.local (an alias for an IP) |
Anatomy of a URL
Some of the most important terms we need to understand are what makes up a URL. A URL is what we type into a browser bar to get to a site (i.e. https://schulichignite.com). Here is a diagram breaking apart the different peices:
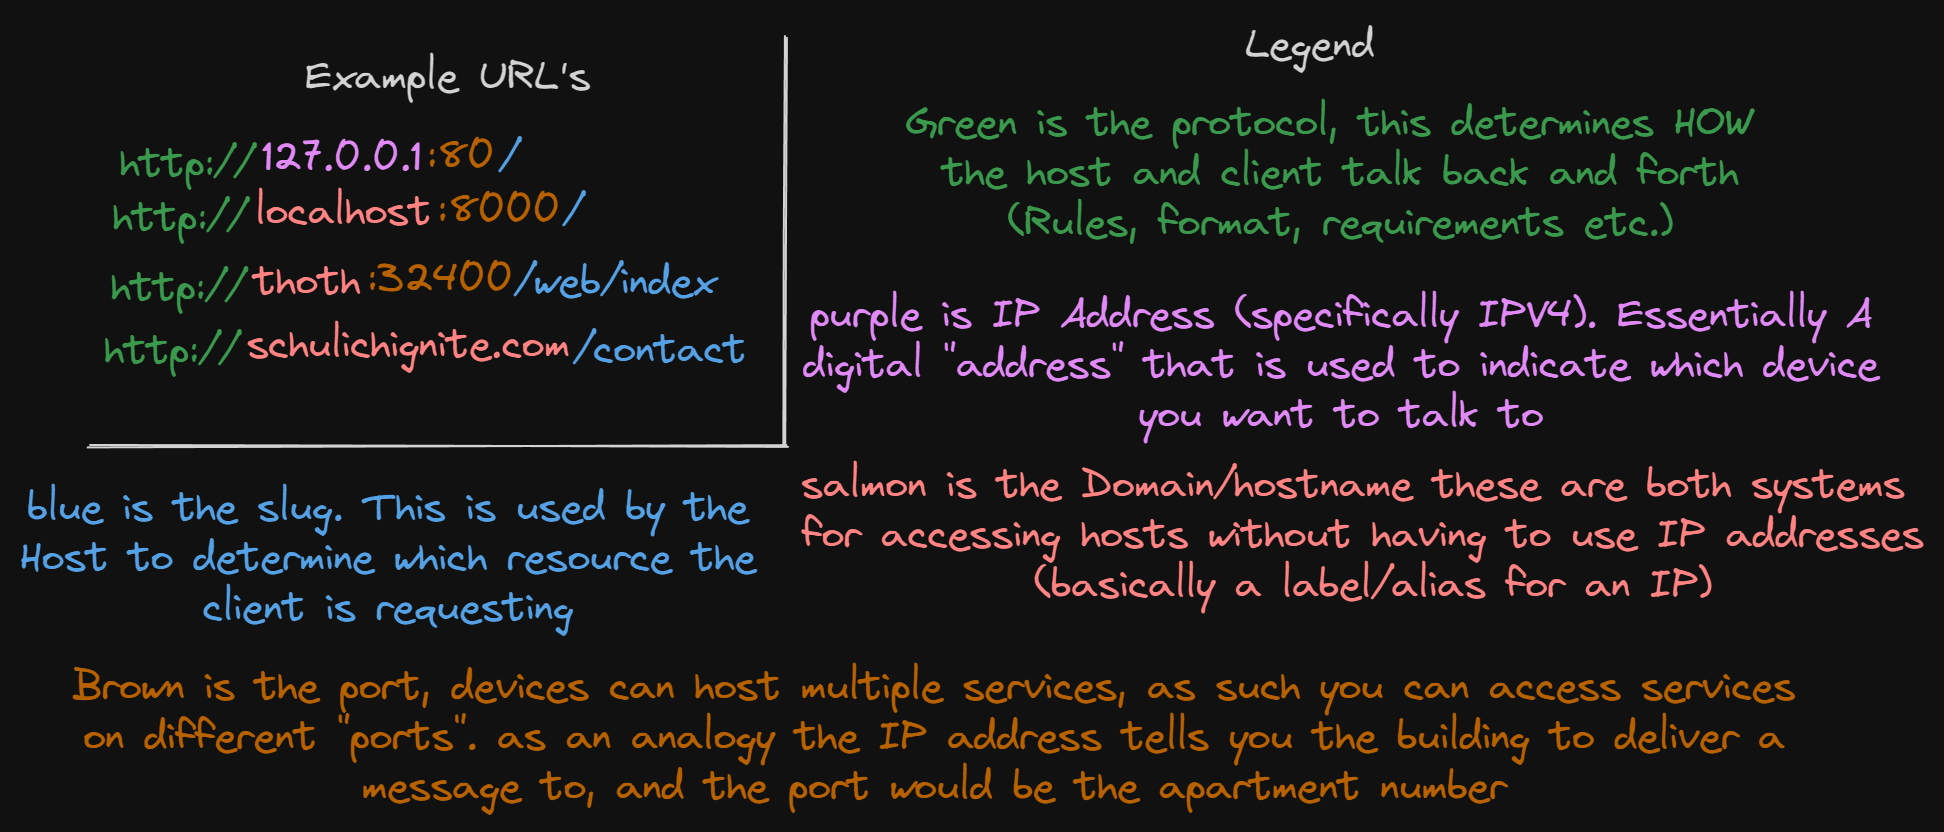
For those of you that can’t read the image, this is the basic anatomy of a URL:
<protocol>://<domain/hostname/ip>:<port(optional)><slug/URI>
For example here are some URL’s:
http://127.0.0.1:80/
http://localhost:8000/
http://thoth:32400/web/index
http://schulichignite.com/contact
http://example-site.co.uk/about-us
| Term | Description | Example |
|---|
| Protocol | The protocol is the rules and procedures that the browser should follow to communicate with the underlying server | http://, https://, file:// |
| Domain | The name of a computer (remote/on a server accessible to the internet) | When you go to google.ca that is a domain, the domain itself is an alias for the IP address of a server that returns the webpage you’re looking for domains have 2 parts, the domain name, and the TLD |
| Domain Name | The domain name is the main portion of the domain, before the . | google, netflix, schulichignite |
| TLD (top-level domain) | These groupings of domains used to serve more of a roll before, but now are mostly all the same. They are the letters that come after a . in a URL, and indicate usually which country the service is from | .ca,.com,.co.uk,.sh |
| Slug/URI | The part that comes after a domain to indicate which specific resource you want from the specified server on the specified port | /, /about,/blog/title |
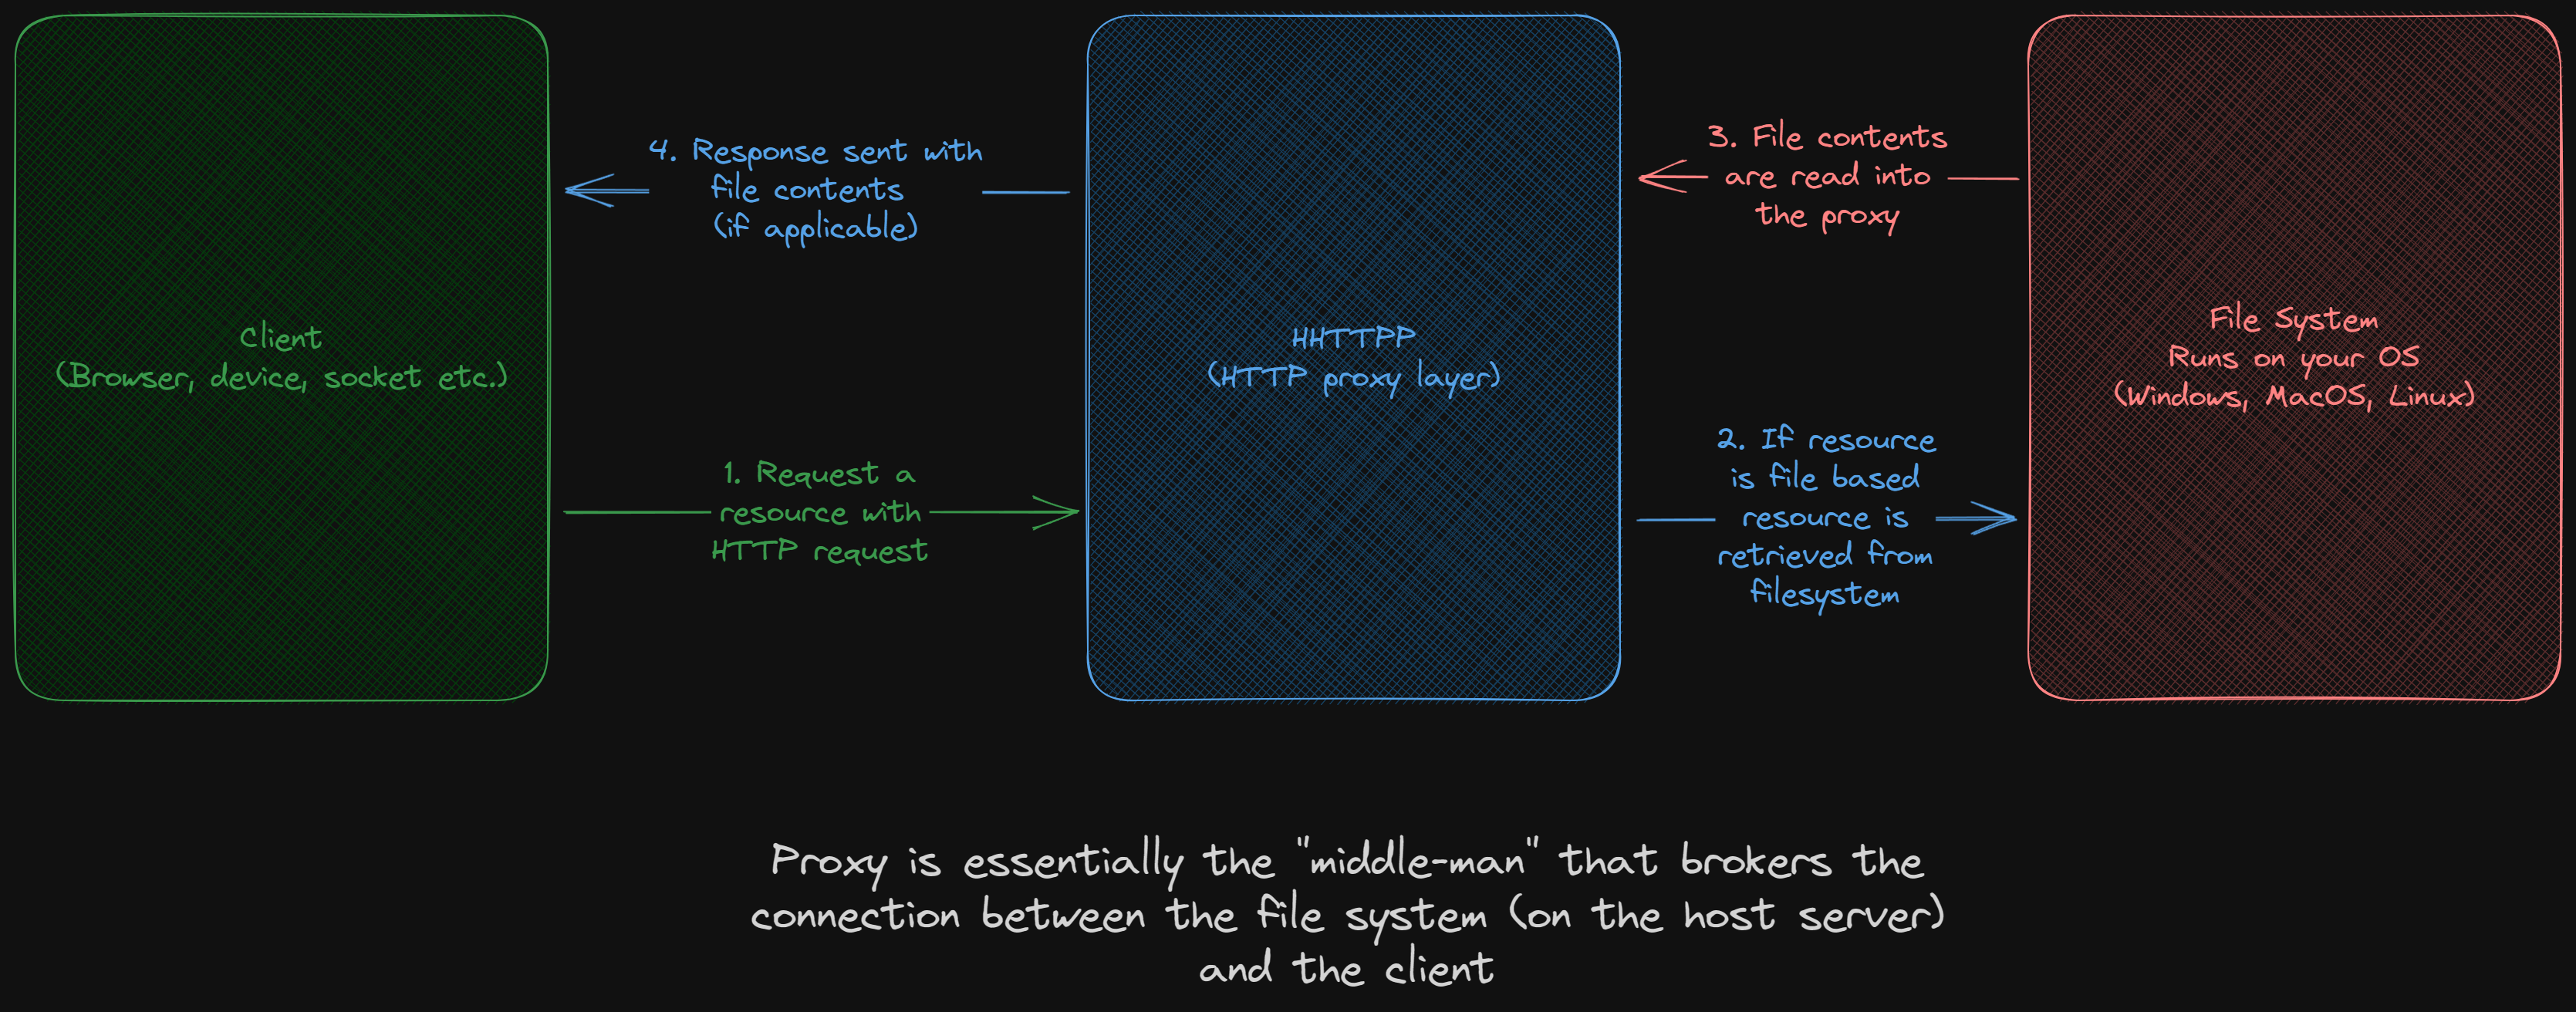
What is an HTTP proxy?
A proxy server in this context is a server that will allow you to access the files in a given folder (called the proxy folder) over HTTP. So essentially when you access a URL on the proxy it will treat the slug as a path to a file. That was a lot of words, so lets look at an example. Let’s say you have a proxy folder:
📁proxy_folder/
├── 📁blog/
│   └── 📄how-to-make-alfredo.html
└── 📄 about.html
Then if it’s proxied to ignite.com if you go to ignite.com/about it will send you the contents of proxy_folder/about.html over HTTP. Essentially ignite.com becomes an alias for proxy_folder and users are basically typing in glorified file paths to get your content. Same thing if you went to ignite.com/blog/how-to-make-alfredo.html would give you the content of proxy_folder/blog/how-to-make-alfredo.html via HTTP:
The functionality for hhttpp is based of the built in http.server module in python (in functionality, not approach). To see what this might look like open up a terminal inside /example_site and then run python -m http.server 8118 from there go to your browser and type in http://localhost:8118. You will be able to access all the pages inside the folder from your browser!
In our case we will be using these files, which when hosted correctly look like this. This is what we’re aiming to recreate with hhttpp!
Order of development
In order to get things to work we will first implement the HTTP information without real networking, once we have an HTTP implementation that works without networking, we will cover networking. The reason we do things this way is because it seperates the complexity so that we aren’t troubleshooting HTTP AND networking at the same time. Once we have the “language” (protocol) we’re going to talk in, then we’ll focus on how to “speak” it (send network requests).
So the series will roughly be in this order for the posts (0 is this post):
- Getting the project setup; Getting the boring python packaging bits out of the way
- Create request and response objects to house our info
- Use request and response objects to generate proper request/response headers and content encoding
- Implementing the networking portion
- Definining a CLI (command line interface); Lets people use our system more easily
Source code
Each post will be in it’s own folder in the git repository. So for example today would be considered post 0, which can be found here. Again the code again is not meant to be the only way to achieve this, it’s a way!
Code-a-long-ness
These posts are not meant to be a code-a-long. There is enough detail to understand what needs to be done, and I give you the info about how to approach the problem. Other than that the solutions to how I decided to do it are available, but I do not go line-by-line through the code at any point.
Python syntax
On top of the usual intermediate to expert python understanding there are a few topics/syntax you may not have encountered you will need to understand to be able to read the code
List comprehensions
A list comprehension syntactically shorter way to produce a list of values with a simple calculation. It is intended to replace the design pattern of:
- instantiating an empty list
- Iterate and store values in the list
- return or use list values.
For example:
result = [] # 1. Initialize empty list

# 2. Iterate and store values in the list
for number in range(10): # Square numbers from 0-9 and add them to the result list
    result.append(number**2)

print(result) # 3. Return or use list values
Can be shortened to:
result = [number ** 2 for number in range(10)] # Steps 1-2

print(result) # 3. Return or use list values
which produces:
[0, 1, 4, 9, 16, 25, 36, 49, 64, 81]
It does exactly the same as the above example, it is just shorter. The basic syntax is [operation for variable in iterable] Were operation is the calculation (or function) being run, variable is the name for the temporary iteration variable made, and iterable is some form of iterable (list, generator, set etc.). We can also do this conditionally, so for example if we wanted to only include even numbers we could do:
evens = [number for number in range(10) if number %2 == 0]
print(evens) # [0, 2, 4, 6, 8]
And we can do an if-else statement using:
evens = ["even" if number %2 == 0 else "odd" for number in range(10)]
print(evens) # ['even', 'odd', 'even', 'odd', 'even', 'odd', 'even', 'odd', 'even', 'odd']
Type hints
Type hints are a way in python to specify the intended type of a variable (not enforced just highly suggested). This works by having a colon, then the type declaration for each varaible/parameter/attribute. You can even include details about return types in functions with def function_name(parameter) -> return_type For example:
age = 21

def greet(name):
   return f"Hello {name}"

class Animal:
   def __init__(self, name):
      self.name = name
Can be converted to:
age:int = 21

def greet(name:str) -> str:
   return f"Hello {name}"

class Animal:
   def __init__(self, name:str):
      self.name:str = name
This gives an indication to people running your code which data types they should use. Along with this there are a few special types to keep in mind (most need to be imported from the typing module):
| Type | Usage | Example |
|---|
| Union | To indicate one type OR another | A variable called age which can be a string or int could be given as age:Union[str,int] = "Twenty Three" |
| Literal | The avlue for the variable is literally one of the subscripted values | x is 2, 4 or 6 only x:Literal[2,4,6] |
| Tuple | A tuple is an imutable data type similar to a list, this can mean a tuple, or is used to indicate multiple return values | The function func() returns an int and a bool in that order def func() -> Tuple[int, bool |
| List | A list is a collection. Collections can be subscripted to tell you what’s inside | users is a list of list of strings users:List[List[str]] = [["kieran"],["James"]] |
| Callable | This means any object that has a __call__() method including functions (yes they are objects) | Passing the function do_stuff() to time(func:Callable) so it can run it and time it time(do_stuff) |
Dataclasses
Dataclasses are a special way to define classes in python. They help make classes more efficient, but have some caveats (that I find are positives), namely all your attributes must be defined with type hints. For example here is a User class the typical python way:
class User:
   def __init__(self, name, age, birthday):
      self.name = name
      self.age = age
      self.birthday = birthday
Now here is the same class in a dataclass:
from datetime import datetime
from dataclasses import dataclass

@dataclass
class User:
      name: str
      age:int
      birthday:datetime
The handy thing about this is that the birthday attribute was not clear in the original example. It could have been a 3 value tuple for year, month, day ((1998,10,28)), a formatted string "28-10-1998" or any other types. But now users know what type they should use (this is not enforced).
If you need to run code after a class instance is created you can use __post_init__(self).
Lambdas
Lambdas are a way in python to declare anonymous functions. What this means is you can assign a function call to a variable. So for example let’s take the simplest case, a function that takes in a name and returns a greeting string using the name:
def generate_greeting(name: str):
   return f"Hello {name}"
We can make this a lambda like this:
generate_greeting = lambda name: f"Hello {name}"
Lambdas follow the form of:
lambda arguments: # Function body
Lambdas always return whatever value is evaluated in the function body. So since we evaluated the string, we get the string back at the end. We can then call it the same way:
generate_greeting("Kieran") # "Hello Kieran"
This comes in handy in cases where something needs a Callable objet, but you don’t need to call it more than once. One example of this is in dataclasses. For some data types (like Lists) you need to provide a Callable object (object with a __call__() funtion) to initialize an attribute that is a list. So you can do this with a lambda that returns an empty list like so:
from dataclasses import dataclass, field

empty_list = lambda : []

@dataclass
class Student:
   grades:List[int] = field(default_factory=empty_list) # Initialize Student.grades to an empty list
Project setup
For the rest of this post we are just going to setup our code, and talk about how the code is setup. We need to get some of the boring stuff out of the way first. I want to create this project so it can be installed and messed with easily. With python you install packages with pip.
How pip works
Pip works with specially formatted python packages to install them to be used on your system. These packages can be stored locally and installed from source files (projects that have a setup.py), or they can be installed remotely from pypi.
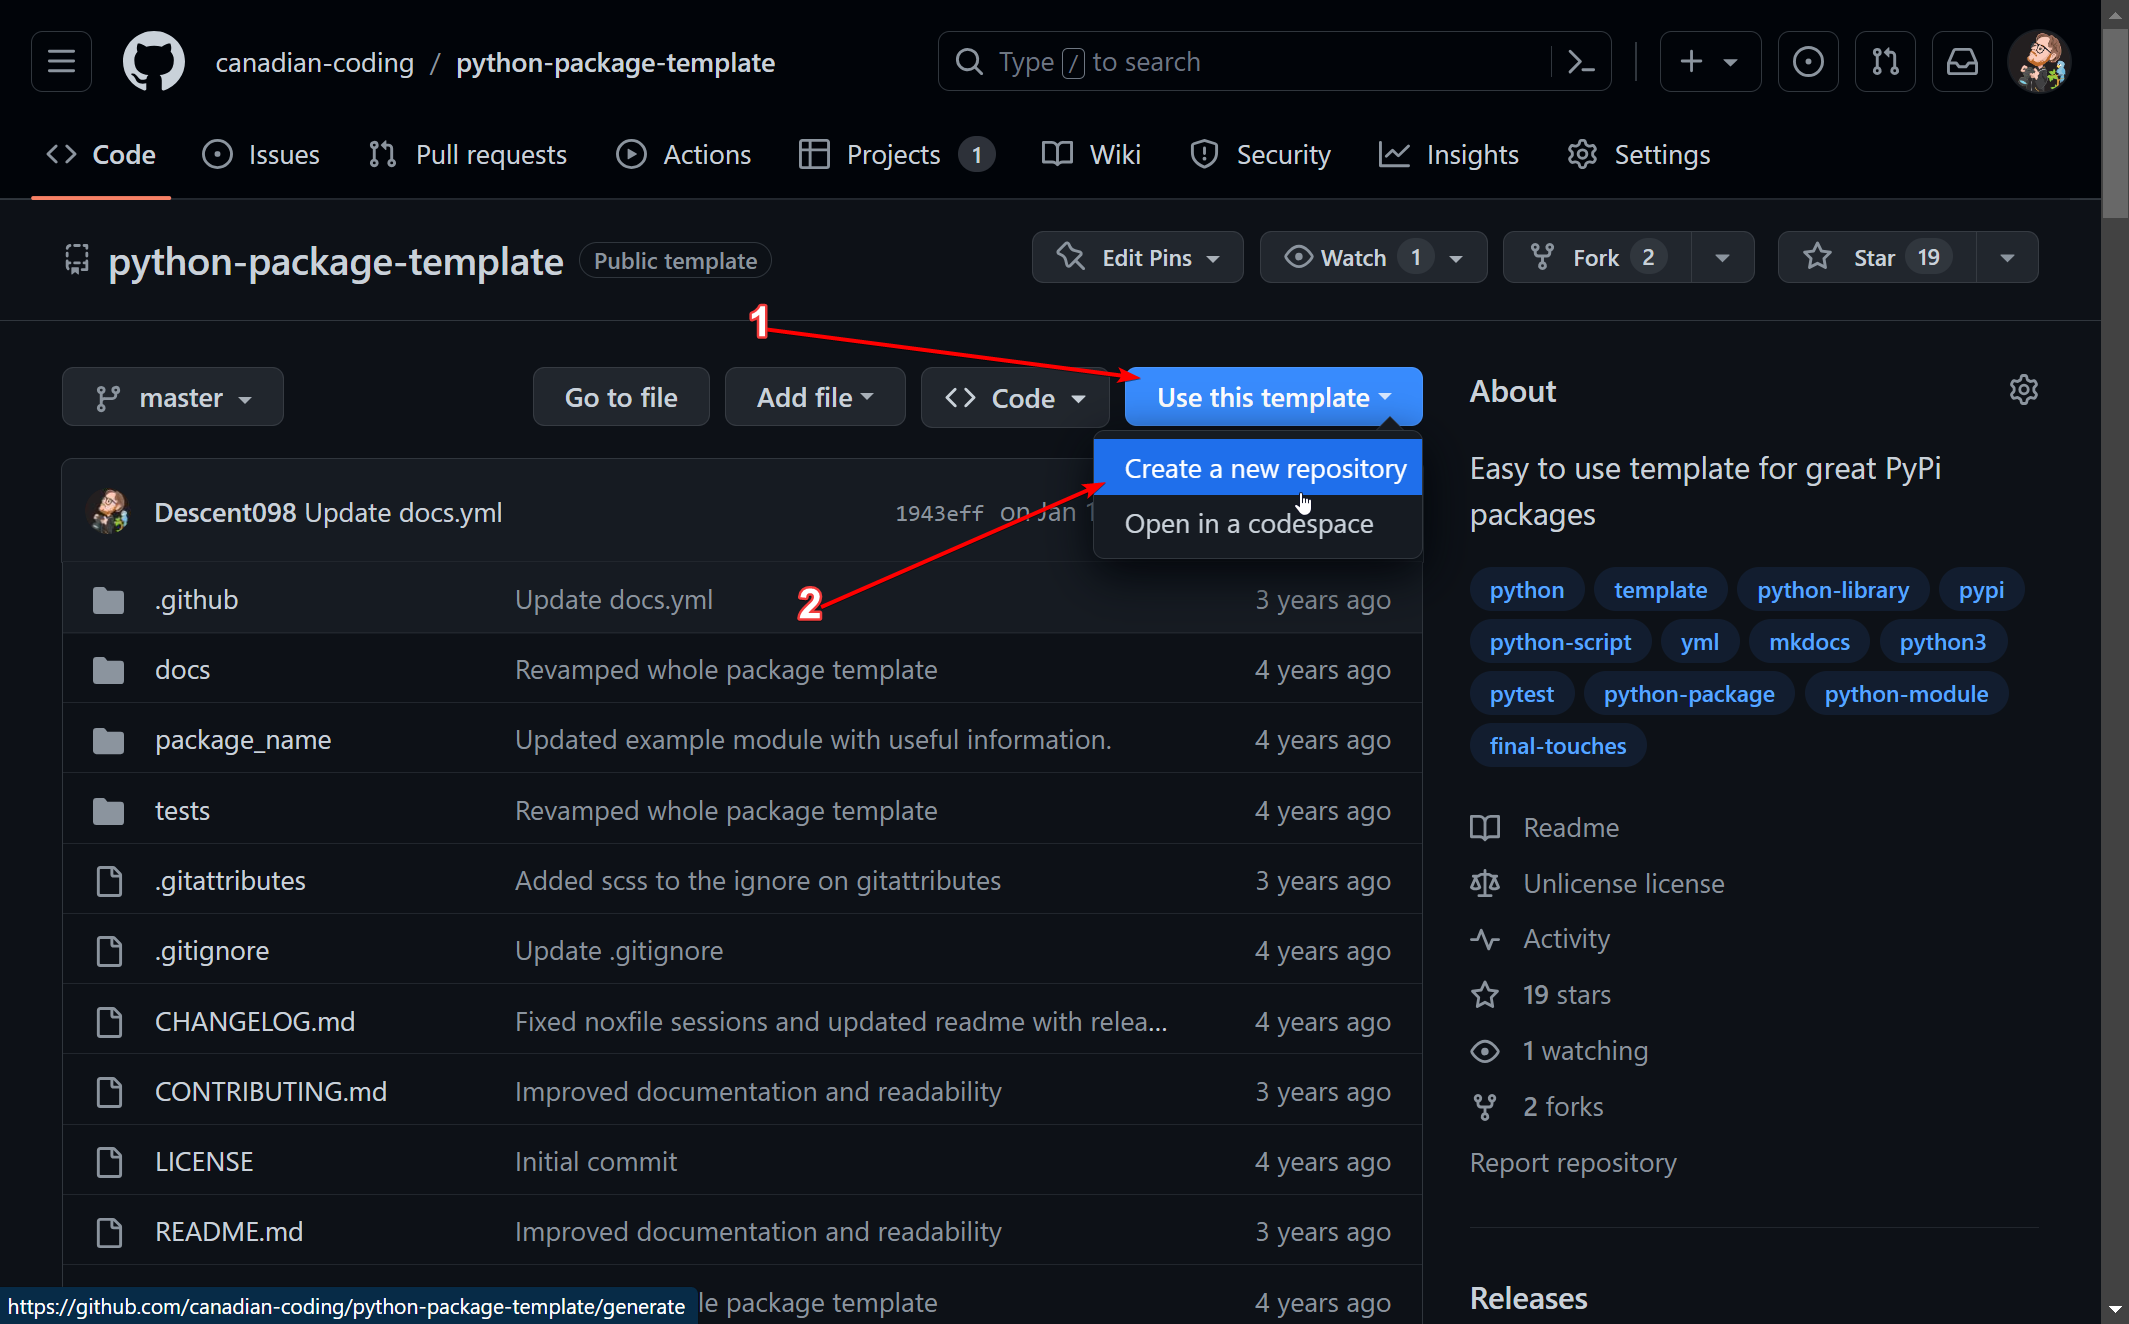
This format has a bunch of stuff that goes into it, so instead of going through everything we’re going to use a template. Specifically we’re going to use this template I created a while back. It’s a bit older, but works well for projects like this. If you are following along (or just interested), you can either download a zip of the code, or if you have a github account you can copy the files as a template directly by hitting Use this Template:
Customizing the template
This template gives you a ton of features, we don’t need a bunch, so I’m going to delete a bunch of the files. After getting rid of them our project looks like this:
├── 📁.github/
│   └── 📁workflows/
│       ├── 📃release.yml
│       └── 📃test-suite.yml
├── 📁hhttpp/
│   ├── 📄__init__.py
│   ├── 📄__main__.py
│   ├── 📄classes.py
│   └── 📄cli.py
├── 📁tests/
│   └── 📄classes_test.py
├── 🗋.gitignore
├── 📃README.md
└── 📄setup.py
So a quick breakdown for now we won’t need to worry about 📁.github/, 📁tests/, or 🗋.gitignore.
So to start with 📄setup.py is the file where we will configure our project so it can be installed and how python should treat it when it’s installed. We won’t need to touch this file anymore after the initial setup!
Now onto the good stuff. 📁hhttpp/ contains all the code that will be part of our package. We have 4 files inside:
- 📄__init__.py; Just a required file to be able to install the package, there’s nothing in there except a version indicaor
- 📄__main__.py; Allows people to run the server using
python -m hhttpp - 📄classes.py; Contains our classes that define our HTTP server
- 📄cli.py; Will be filled out later, but will contain code to let people use the CLI
This sets us up well for being able to start building our package!