In the last article we looked at version control systems. We looked at a very manual way of building one out with file folders, and noticed a few issues with our approach:
- We were using up a ton of space because we’re duplicating files for every folder
- We had no way to relate what features correspond to which days
- We had no way to revert portions of each days code easily (i.e. need to remove 1 feature but keep rest of changes)
- We had no easy way to maintain non-chronological versions alongside normal versions
- We had no easy way to collaborate and have others able to work on large features simultaneously
So this is where git comes in. Git is a version control system developed by Linus Torvolds to make it easy to manage software versions, especially in a team. So today we will look at the basics of using git to manage some software.
How does git work?
Git at it’s core uses a system of tracking only differences between files. You first create a repository (folder with your code), and then git will only track the changes that happen within that repository. So if you add a file, or remove a line from a file, it will only store the difference in what you did. Each of these sets of changes it records are called a commit. So for example let’s say you have a folder structure that looks like this:
📁project/
├── 📁.git/
└── 📄main.py
Inside /project (our repository or repo) we currently only have main.py. The /.git folder is added automatically when you initialize a repository with git. We won’t cover it during these articles but if you are interested this is what stores all of the information about your repo in it and is what makes something a “git repo” instead of just a file folder. For details about what’s inside, check out this link.
If we were to add a line to this file on line 10 that said print("Hello World") git would store it as something like (this is not actually how it’s stored) + /project/main.py L10: print("Hello World"). In this format it stores that you added something new (the +), the file (the /project/main.py), the line number(s) L10 and what was added print("Hello World"). This means in order to go back in time to revert it would just change the + to a -, and to go forward in time from an old version it just runs normally.
Steps to working with git
So now we will cover how to actually use git. In our case we will use the git command line tool, but there are also visual tools available (like github desktop which we will cover in the next article). For now we will cover the basic steps 1-by-1 assuming you have git installed, so if you don’t go and download and install it to follow along!
Standard git flow
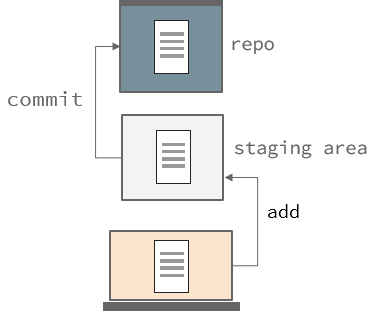
Git has a standard set of steps to use it locally:
- Init (local) a repo
- Add our changes that we want to save (staging)
- Commit (save) our changes
- Repeat steps 2 - 3 as you develop your project
So we will now create our example from the How does git work? section.
1. Init
First we need to init our repo, this will create a folder and add a /.git folder for us. To do this we wll run the git command using the pattern git init <project_name> or in our case git init project, which should leave a message like:
~/Desktop $>git init project
Initialized empty Git repository in ~/Desktop/project/.git/
From there we can now cd project to enter the folder in our terminal. We can check the status of our git repo using git status. In our case since we haven’t done anything it will just tell us it’s empty. So we can now add a python file called main.py. Use whatever editor you want to create a file and add print("Hello World") to it. In my case I will do this from the command line using echo print("Hello World") > main.py. If we run git status now we see:
~/Desktop/project $>git status
On branch master

No commits yet

Untracked files:
  (use "git add <file>..." to include in what will be committed)
        main.py

nothing added to commit but untracked files present (use "git add" to track)
2. Stage
If we read the message it tells us we need to add our changes. This in git is called “staging”. You can think about this like telling git which files you want to save your changes to. You don’t always want to commit to changing all the files you’re working on, and so this intermediate step lets you pick which parts are part of the changes you want to make:
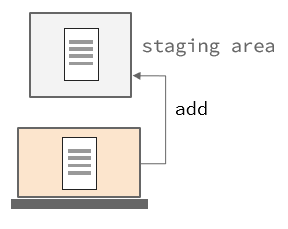
We use git add <file> and then point to a file path to add them. It also supports globbing, and if you just want to add everything you can just use git add . (which is what I will run). We can then re-run our git status:
~/Desktop/project $>git add .

~/Desktop/project $>git status
On branch master

No commits yet

Changes to be committed:
  (use "git rm --cached <file>..." to unstage)
        new file:   main.py
We now see a new section called “changes to be committed”. We can remove files with git rm --cached <file> if we want to, but in our case we are fine with our changes and are ready to commit to them.
3. Commit
To commit our changes (think of it like saving) we need to make a commit, and attach a message to it. You can put whatever you want in the message, but I would recommend using a semantic commit message system since this is what will show up in our history, and the better the message is the easier it is to revert changes later!
So to commit to our changes we just run git commit -m "<message>" and replace <message> with something to help us remember what we did. In our case I’ll say git commit -m "Added main file". We can then we our changes with git status:
~/Desktop/project $>git commit -m "Added main file"
[master (root-commit) 1b3779a] Added main file
 1 file changed, 1 insertion(+)
 create mode 100644 main.py

~/Desktop/project $>git status
On branch master
nothing to commit, working tree clean
Whenever you see “nothing to commit, working tree clean” you know you have successfully saved your changes. Here is the full set of commands and their outputs from the terminal:
C:\Users\kiera\Desktop\development\personal>git init project
Initialized empty Git repository in C:/Users/kiera/Desktop/development/personal/project/.git/

C:\Users\kiera\Desktop\development\personal>cd project

~/Desktop/project $>git status
On branch master

No commits yet

nothing to commit (create/copy files and use "git add" to track)

~/Desktop/project $>echo print("Hello World") > main.py

~/Desktop/project $>git status
On branch master

No commits yet

Untracked files:
  (use "git add <file>..." to include in what will be committed)
        main.py

nothing added to commit but untracked files present (use "git add" to track)

~/Desktop/project $>git add .

~/Desktop/project $>git status
On branch master

No commits yet

Changes to be committed:
  (use "git rm --cached <file>..." to unstage)
        new file:   main.py


~/Desktop/project $>git commit -m "Added main file"
[master (root-commit) 1b3779a] Added main file
 1 file changed, 1 insertion(+)
 create mode 100644 main.py

~/Desktop/project $>git status
On branch master
nothing to commit, working tree clean
Checking our history
I’m going to add 1 more change, which is to add a file called readme.txt with some text, and change our initial python file’s contents:
~/Desktop/project $>echo Hey, welcome to my project! > readme.txt

~/Desktop/project $>echo print("Hey, welcome to the project!") > main.py

~/Desktop/project $>git add .

~/Desktop/project $>git commit -m "Added readme.txt and updated welcome message in main.py"
[master 7bbd728] Added readme.txt and updated welcome message in main.py
 2 files changed, 2 insertions(+), 1 deletion(-)
 create mode 100644 readme.txt
Now we have 2 changes we can see our history using git log:
~/Desktop/project $>git log
commit 7bbd728b3a3330ad2a3bce65e96f417f9e599b91 (HEAD -> master)
Author: Kieran Wood <[email protected]>
Date:   Tue Sep 19 18:01:03 2023 -0600

    Added readme.txt and updated welcome message in main.py

commit 1b3779abdc28255dcc6a1be8699c2d5bb5a8bb71
Author: Kieran Wood <[email protected]>
Date:   Tue Sep 19 17:58:34 2023 -0600

    Added main file
Each of the messages appear under the commit. The important thing to see here is that there is a bunch of numbers and letters after commit, this is the commit hash. This commit hash is what allows you to go back in time. Let’s say we wanted to revert our last set of changes we can copy the commit hash of the first commit and use git reset <commit_hash> to revert to that commit:
~/Desktop/project $>git reset 1b3779abdc28255dcc6a1be8699c2d5bb5a8bb71
Unstaged changes after reset:
M       main.py

~/Desktop/project $>git status
On branch master
Changes not staged for commit:
  (use "git add <file>..." to update what will be committed)
  (use "git restore <file>..." to discard changes in working directory)
        modified:   main.py

Untracked files:
  (use "git add <file>..." to include in what will be committed)
        readme.txt

no changes added to commit (use "git add" and/or "git commit -a")
So we can see now our changes are stil there in the files, but they have been “undone” in git. We can then throw away these changes using git restore . to get rid of changed files and we can delete the “new” files (readme.txt in our case).
Remotes
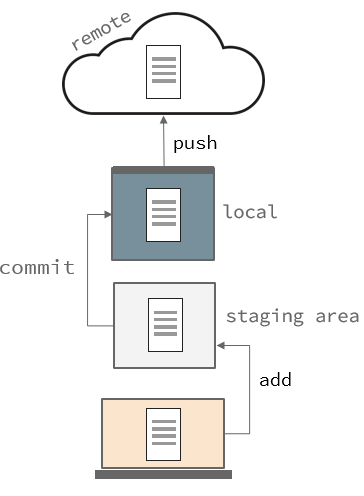
We’ve looked at using git repos locally, but you can also use them over the internet. This is more useful for teams because your changes can synchronize with one another. In order to do this we have to modify our workflow a bit from earlier:
- Clone (remote) a repo
- Add our changes that we want to save (staging)
- Commit (save) our changes
- Push our commit
- Repeat steps 2 - 4 as you develop your project
Since we’re familiar with 2,3 and 5 we won’t cover them again. We will be walking through how to do this using github in the next article.
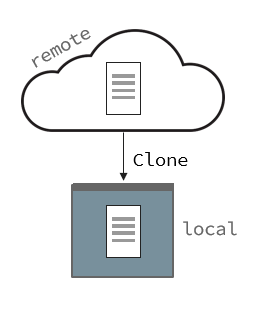
To clone or not to clone
You can choose to start your git repo the same way using git init if you want, but this is much more complicated. I would highly recommend whichever service you’re using you should setup a repo on their service, and then run git clone <URL>. For example with my project ezcv I can run git clone https://github.com/descent098/ezcv which will pull down everything and set it up for me:
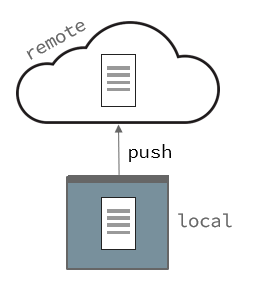
After committing
After you do steps 2 and 3 you have your changes saved locally, in order for them to show up remotely you need to push your commits by running git push:
Using branches
We’ve seen the basic usage of git, but there’s more that we can do. What happens if we want to be able to work on multiple features at once? Or go work on a feature that might break things? How do we encapsulate our changes so each person working on a feature doesn’t end up stepping on each others toes. That’s where branches come in. Branches let you develop in parallel with other branches. Let’s say we wanted to add a new feature here’s our steps:
- We can create a branch using
git branch <branch_name>. For example git branch my-feature - Now we’ve created the branch we can switch to it using
git checkout <branch_name>
We are now on our separate branch. You can see this diagram below where it goes from left to right in time, and each dot is a commit. You can see our code branches and then commits can happen simultaneously:
%%{init: {'gitGraph': {'showBranches': true,'showCommitLabel': false}} }%%
gitGraph:
    commit
    branch my-feature
    checkout my-feature
    commit
    commit
    checkout main
    commit
    checkout my-feature
    commit
    commit
    checkout main
    commit
    commit
You can combine the two steps together with git checkout -b <branch_name>. Now let’s say you want to take the changes on your branch and merge them back into the main branch that existed before. You can do so by changing into the main branch (git checkout master) and then merging using git merge <branch_name>:
~/Desktop/project $>git checkout -b my-feature
Switched to a new branch 'my-feature'

~/Desktop/project $>git status
On branch my-feature
Untracked files:
  (use "git add <file>..." to include in what will be committed)
        readme.txt

nothing added to commit but untracked files present (use "git add" to track)

~/Desktop/project $>git add .

~/Desktop/project $>git commit -m "Added a readme for information about project"
[my-feature 54965bb] Changes
 1 file changed, 1 insertion(+)
 create mode 100644 readme.txt

~/Desktop/project $>git checkout master
Switched to branch 'master'

~/Desktop/project $>git merge my-feature
Updating 1b3779a..54965bb
Fast-forward
 readme.txt | 1 +
 1 file changed, 1 insertion(+)
 create mode 100644 readme.txt
*Keep in mind historically the “main” branch was called “master”, but some services have changed the name to “main”. You can check this by listing branches using git branch
Pull requests
When working remotely the first time you try to push a branch you will get a message saying:
~/Desktop/project $>git checkout -b my-feature
Switched to a new branch 'my-feature'

~/Desktop/project $>git status
On branch my-feature
Untracked files:
  (use "git add <file>..." to include in what will be committed)
        readme.txt

nothing added to commit but untracked files present (use "git add" to track)

~/Desktop/project $>git add .

~/Desktop/project $>git commit -m "Added a readme for information about project"
[my-feature 54965bb] Changes
 1 file changed, 1 insertion(+)
 create mode 100644 readme.txt

~/Desktop/project $>git push
fatal: The current branch my-feature has no upstream branch.
To push the current branch and set the remote as upstream, use

  git push --set-upstream origin my-feature
To solve this run the command it mentions git push --set-upstream origin <branch_name> to break this down “upstream” means which location, and origin is wherever has been configured in the git config. So git push --set-upstream origin <branch_name> uploads <branch_name> to the origin server upstream.
But now what do you do if you want to merge the branch to the master branch remotely? This is where pull requests come in. They are often used when someone outside the organization (or another person) is trying to contribute to a project. Usually access to push to main/master is limited to the repository owner, and people they invite. As such people usually have to create a branch, and create a pull request. A pull request is just what it sounds like, you are requesting someone to pull your pushed code into their main/master branch. Here is an example of a pull request with many commits to move the project from version 2 to version 3.
Merge conflicts
What happens if two people modify the same line of the same file and then each submit a pull request? When you try to merge the second request you will get a merge conflict. These are very hard to deal with locally, but remotely there are many tools to help you manage them. If you do have to deal with them locally I would recommend using the built in VSCode plugin to resolve the issue, as doing it manually is quite difficult.
Conclusion
Now that we’ve seen how to use git there’s the question of how we manage our git projects. We don’t want to just have to constantly send people folders and files of our git repositories, so what can we do to make this easier.
Next time we will talk about github, an online git provider that will make it easier to interface with your git repos, be able to share them easily, and make it easier for others to help contribute!