Hashing is an incredibly important concept in computer science. It’s used in everyting from validation to speeding up our data lookups. If you haven’t yet please read our definition of hashing, this will cover the base concepts used in this article, and will go into some of these use cases in more detail.
The focus on this article will be starting from scratch to create a hashing algorithm which can then be used in 3 use cases:
- As a password storage and validation system
- To create a HashTable
- To do subresource integrity from scratch
You can find a full copy of the source code for this article here.
A Custom Hashing Algorithm
As we talked about in the definition of hashing, hash functions have a few properties we want:
- Take in an input of arbitrary length
- Create a unique sequence for each input (1 input to 1 output ideally)
- Ideally have fixed-length output (this is nice for certain systems)
With these in mind we can create a simple hashing function with a few steps:
- Convert the input value to string if it’s another data type
- Start with the number 1, for each character in the input multiply the current hash by the index of the character in the following lokoup table:
ASCII_TABLE = ['0', '1', '2', '3', '4', '5', '6', '7', '8', '9', 'a', 'b', 'c', 'd', 'e', 'f', 'g', 'h', 'i', 'j', 'k', 'l', 'm', 'n', 'o', 'p', 'q', 'r', 's', 't', 'u', 'v', 'w', 'x', 'y', 'z', 'A', 'B', 'C', 'D', 'E', 'F', 'G', 'H', 'I', 'J', 'K', 'L', 'M', 'N', 'O', 'P', 'Q', 'R', 'S', 'T', 'U', 'V', 'W', 'X', 'Y', 'Z', '!', '"', '#', '$', '%', '&', "'", '(', ')', '*', '+', ',', '-', '.', '/', ':', ';', '<', '=', '>', '?', '@', '[', '\\', ']', '^', '_', '`', '{', '|', '}', '~', ' ', '\t', '\n', '\r', '\x0b', '\x0c']
- Fix the length of the output to 128 characters.
- If the resulting hash is less than 128 characters take the difference between the current length of hash and 128, for each of those characters append the character at the index of the current loop itteration in the lookup table (see below for example)
- if longer truncate to the first 128 characers
For example if you had a hash with 126 characters then the loop would start ‘0’ would be appended to end of current hash, then on next itteration ‘1’ would be appended. Leaving us with <current_hash>10 to pad it to 128. Since we want exactly 128 characters we go to 9, then strip the digit for every digit added (i.e. 101 would become 1, and 20 would become 0)
Here is the full code:
import sys
from typing import Union, Tuple
from string import printable as ASCII_TABLE

sys.set_int_max_str_digits(0) # Disable string conversion length limit in python

def hash_function(value:Union[str, int, float, Tuple]) -> str:
    # Hashes a provided value
    value = str(value) # Make sure value is a string
    hash = 1 # Start hash at 1 or else every multiplication would result in 0
    for character in value: # Multiply each character by ascii value to current hash
        hash *= ASCII_TABLE.index(character)

    hash = str(hash) # Convert hash back to a string
    if len(hash) < 128: # Too short, need to pad hash
        for number in range(128-len(hash)):
            if number > 99: # Only single digit values allowed
                number //= 100
            elif number > 9:
                number //=10
            hash += str(number)
    elif len(hash) > 128: # Too long, need to truncate hash
        hash = hash[0:128]

    return int(hash)
With these in mind the you want a hashing algorithm to avoid collisions. Collisions happen when more than 1 item results in the same output hash. This creates lots of problems in tons of different ways, and should be avoided…
Our hashing algorithm will have quite a few collisions. This could actually be avoided by changing a few things, but I wanted collisions to be easy to generate so for the HashTable we can measure how much of a performance hit it causes (that’s my excuse and I’m sticking to it)!
Specifically our hashing algorithm will create collisions on any anagrams (words created from same letters i.e. race and care have the same letters [“a”, “c”, “e”, “r”]). This is because the multiplication of the ASCII values will be the same since it doesn’t matter which order numbers are in for multiplication. We could for example have made an algorithm that divides until the value is less than 1, then bit-shift right the resulting floating point number by 128 bits, and strip the remainder, this would give us less collisions. Feel free to try implementing it yourself.
A Password System
Now we have a hashing algorithm we can start by creating a system for users to login with. There are tons of ways to do this. For us we’re going to create a User object, that stores the users information, and we will keep a list of User’s to act as a “database” for people to login to.
So in our case we setup our salt and pepper:
SALT = "%^&(!%#@@#$&$@&#!^%)"
PEPPER = "!@^%@#&#@#(@*&@%&)"
Then our User class is:
from dataclasses import dataclass

@dataclass
class User:
    name: str
    username:str
    email:str
    age: int
    password: str
Which we then have a “database” called users which we will add to as users sign up:
users = [
    User("Kieran", "descent098", "[email protected]", 24, hash_function(PEPPER + "you'll_never_guess_my_password" + SALT))
]
We can now create our signup() and login() functions:
# Import hash function we wrote
from hashing import hash_function

def signup(name:str, username:str, email:str, age:int, password:str):
    # Lets you create a new user

    # Format the password properly
    password = PEPPER + password + SALT # Add salt and pepper to password
    password = hash_function(password) # Hash password

    for user in users: # Make sure user doesn't exist already
        if user.username == username:
            raise ValueError(f"User with username: {username} already exists")
    # Update the global "database" (just a variable in our case)
    users.append(User(name, username, email, age, password))

def login(username:str, password:str) -> User:
    # Allows a user to login

    # Format password
    password = PEPPER + password + SALT # Add salt and pepper to password
    password = hash_function(password) # Hash password

    for user in users: # Look for user
        if user.username == username: # Found user
            if user.password == password: # Correct password
                return user
            else: # Bad password
                raise ValueError(f"Incorrect password for user {username}")
    # Couldn't find user with specified username
    raise ValueError(f"User {username} does not exist")
A few notes about this approach in the real world:
- You would never really want a salt and pepper so easily accessible in a plaintext file, use something like an environment variable to store the info
- Even though they are hashed you want to be careful with allowing anyone the hashed passwords, this approach helps with security, but there are tons of attacks it’s still vulnerable to
- You would want to do the salt and peppering before you sent the password to your system, otherwise if someone intercepts the data they have the user’s plaintext password
- It is likely better to use a HashMap or a real database to lookup users, it will be much faster than searching the entire list of users every time
HashTable
A HashTable (sometimes called HashMap or Dictionary) is used to create key-value pairs. So instead of list indicies we use key->value pairs, where we can create “indicies” using things like strings. An example would be JSON, or a dictionary in python that looks like this:
user = {"name": "Kieran","age": 24}
With this code we can now access the user dictionary, but instead of indicies we use the value to the left of the colon (i.e. “name”, or “age”):
user["name"] # "Kieran"
user["age"] # 24
A much more in-depth look can be found here, but basically we’re going to use our hash function to create a HashTable, which will give us the same functionality as a python dictionary. In order to do this we will need a few classes:
from dataclasses import dataclass

@dataclass
class Node:
    key: str
    value: Any

@dataclass
class HashTable:
    buckets: List[List[Node]]
A node will be where we store the key-value pair, which will then be placed into our buckets list/Array. We also need to decide how many buckets we want, for now we will arbitrarily pick 6 (because it makes the drawings easier 😉) but we will discuss what more or less buckets does shortly. The basic idea is that we will use a hashing function to generate an index location in the buckets list, we will then insert the node at that index in the buckets list. This means that for searching later we can skip searching all values in any of the other buckets!
So the insertion would take the steps:
- Create HashTable with 6 empty buckets
- Take the key you want to insert and hash it with some algorithm (make sure resulting hash is just numbers)
- Take that hash and modulo (divide by and take the remainder) it by the number of buckets (in our case 6)
- Create a node which contains the value and the key
- Insert the node into the index you calculated from the key
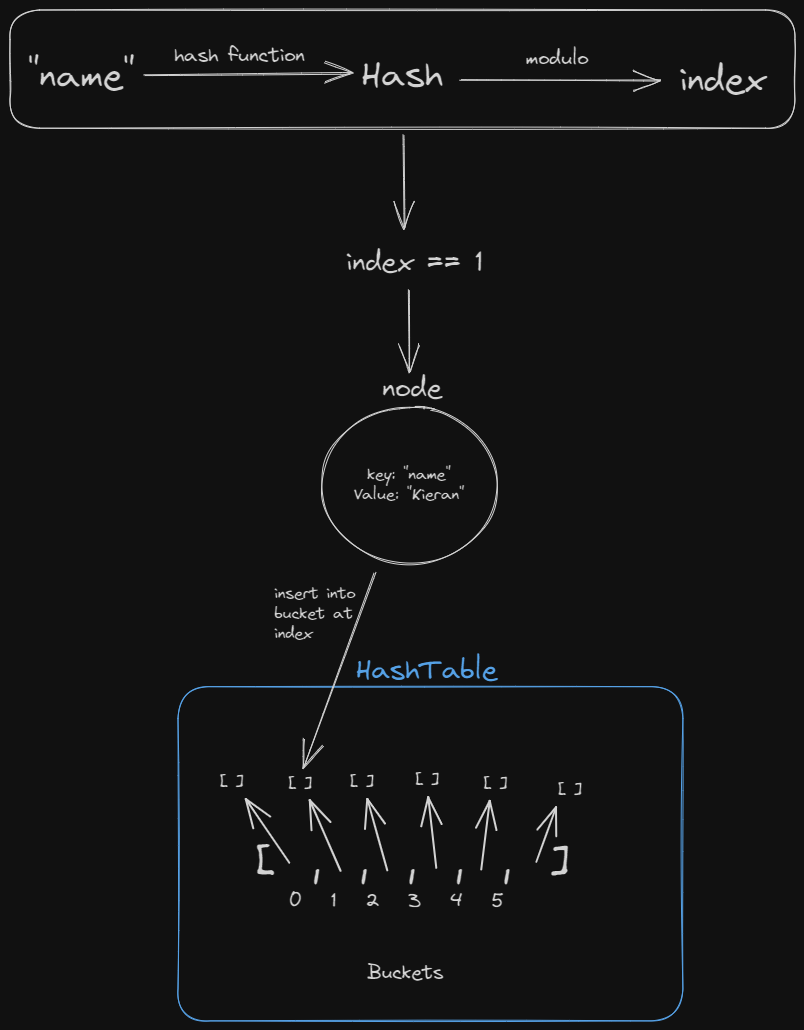
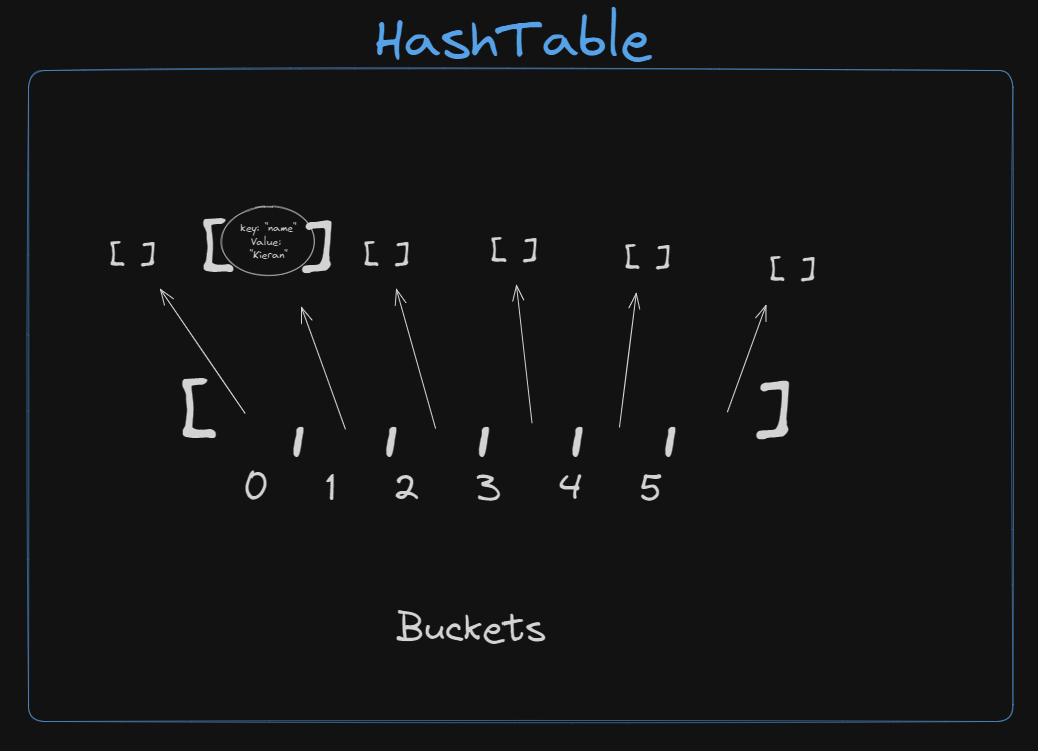
After insertion:
For searching/finding we would have the following algorithm:
- Take the key you want to find and hash it with some algorithm (make sure resulting hash is just numbers)
- Take that hash and modulo (divide by and take the remainder) it by the number of buckets (in our case 6)
- Look into the
HashTable at the given index, if list at index is empty throw an error, if not then go through the list at that index and check each node in the list until you find one with the same key, if you hit the end of the list then throw an error
So for steps 1-2:

Now we have the index we can do step 3

The code for the whole HashTable can be found here:
from hashing import hash_function
from dataclasses import dataclass, field
from typing import Any, List

# NOTE: HashTables in this example are using 16 buckets, not 6

@dataclass
class Node:
    key:str
    value: Any

@dataclass
class HashTable:
    # A standard HashTable to store key-value pairs

    buckets:List[List[Node]] = field(default_factory=lambda: [[] for _ in range(16)]) # Setup 16 empty "buckets"

    def insert(self, key:str, value:Any):
        # Inserts a key-value pair into the buckets

        # 2 & 3 Hash the key and then modulo the result by 16
        index = int(hash_function(key) % 16)

        # 4.  Create a node which contains the value and the key
        new_node = Node(key, value)

        # 5. Insert the node into the index you calculated from the key
        if self.buckets[index]: ## If the bucket already has values
            self.buckets[index].append(new_node)
        else: ## If bucket was empty
            self.buckets[index] = [new_node]

    def find(self, key:str) -> Any:
        # Find a value for a given key

        # 1 & 2 Hash the key and then modulo the result by 16
        index = int(hash_function(key) % 16)

        # 3. Look into the bucket at the given index
        if self.buckets[index]:
            ## 3.1 Check each node in the bucket to find the matching one
            for node in self.buckets[index]:
                ## 3.2 The current node matches the key you're looking for
                if node.key == key:
                    return node.value
            raise ValueError(f"No value found for key {key}")
        else:
            raise ValueError(f"No value found for key {key}")
We can then test this code with:
# Test original Hash table
ht = HashTable()

## Make inserts
ht.insert("novelty", 10)
ht.insert("yeotlvn", 11)
ht.insert("voetlny", 12)
ht.insert("eoltvyn", 13)
ht.insert("asdfgsdfg", 10)

## Find
print(ht.find("novelty"))
print(ht.find("yeotlvn"))
print(ht.find("eoltvyn"))

## Check buckets
print(ht.buckets)

## Find that doesn't exist
print(ht.find("Ay Lmao")) # Raises an Error
Which gives us:
10
11
13
[[], [], [], [], [], [], [], [Node(key='novelty', value=10), Node(key='yeotlvn', value=11), Node(key='voetlny', value=12), Node(key='eoltvyn', value=13), Node(key='asdfgsdfg', value=10)], [], [], [], [], [], [], [], []]
Traceback (most recent call last):
  File "C:\Users\WOODKM\Desktop\development\hashing\hashing-main\hashtables.py", line 194, in <module>
    print(ht.find("Ay Lmao")) # Raises an Error
          ^^^^^^^^^^^^^^^^^^
  File "C:\Users\WOODKM\Desktop\development\hashing\hashing-main\hashtables.py", line 85, in find
    raise ValueError(f"No value found for key {key}")
ValueError: No value found for key Ay Lmao
An improved version can be found here. The main changes are using some of python’s magic methods to make the HashTable more useable, so we just need to rename our methods:
insert() –> __setitem__()find() –> __getitem__()- Add a
__repr__() and __str__() method which makes a nicer display when you print the instance
If we call this new class HashTableImproved we can now use this class using:
# Test improved hash Table
ht2 = HashTableImproved()

## Uses __setitem__()
ht2["novelty"]=10
ht2["yeotlvn"]=11
ht2["voetlny"]=12
ht2["eoltvyn"]=13
ht2["asdfgsdfg"]=10

## Uses __repr__() and __str__()
print(ht2) # HashTableImproved: {'novelty':10,'yeotlvn':11,'voetlny':12,'eoltvyn':13,'asdfgsdfg':10}

## Uses __getitem__()
print(ht2["novelty"])# 10
print(ht2["yeotlvn"])# 11
print(ht2["eoltvyn"])# 13

print(ht2["Ay Lmao"]) # Raises an error
Sub-Resource Integrity
When you’re downloading a file from the internet you are fundamentally getting it from a network. How do you know that someone has not replaced the original file in transit to your device? How do you know the image your downloading isn’t actually some malicious code? One way to check is with integrity hashes. For more details you can see this section of our definition of hashing.
For our implementation our basic approach is to:
- Take input HTML as a string
- Parse information about all the script tags in the text, and put them into a list of HashTable’s
- Loop through each of the tags and verify that if there is an integrity hash the provided file or inner content of the tag hashes to the same value
To Achieve this there are 4 functions:
check_input_integrities(): This function takes in the input text and raises a ValueError if any of the tags do not have matching integritiesget_script_tag_information(): Takes in the input text, finds all script tags and returns a list of HashTable, where each HashTable is the information about a script tagcheck_tag_integrity(): Takes in the integrity hash, the function object for the hash function, and either the inline JS, or location of the file to check the integrity hash againstgenerate_script_with_integrity(): Can take in input text or a script file location and give you back a valid script tag with the correct integrity information
So to start off with we pass our input HTML to check_input_integrities(), which in turn immediately calls get_script_tag_information() to get the details of each tag.
The code for check_input_integrities() is as follows:
def check_input_integrities(input_text: str):
    # Finds and verifies the integrities of all script tags in input HTML
    tags = get_script_tag_information(input_text) # Get list of script tags and their information

    for tag in tags: # Check each tag's integrity
        if tag["integrity_scheme"] and tag["integrity_hash"]: # Has a hash and listed integrity scheme (hash function)
            if tag["src"]: # If tag pulls from a js file
                check_tag_integrity(tag["integrity_hash"], file_location=tag["src"])
            else: # If tag is inline JS
                check_tag_integrity(tag["integrity_hash"],inline_js=tag["inner_content"])
Before we get into the code of get_script_tag_information() we need to understand a concept called pattern matching. Broadly speaking what this means is that we have some system that we can define a pattern in some text, when that pattern is matched, we return the info. In our case we are using regex (regular expressions, or rational expressions) to do pattern matching for finding the info about our script tags. This is definitely a shortcut (this guy wouldn’t be happy about), but it works well for what we need.
So with regex we first define a pattern, a pattern is the string that tells regex what rules we want for finding text. Our pattern is:
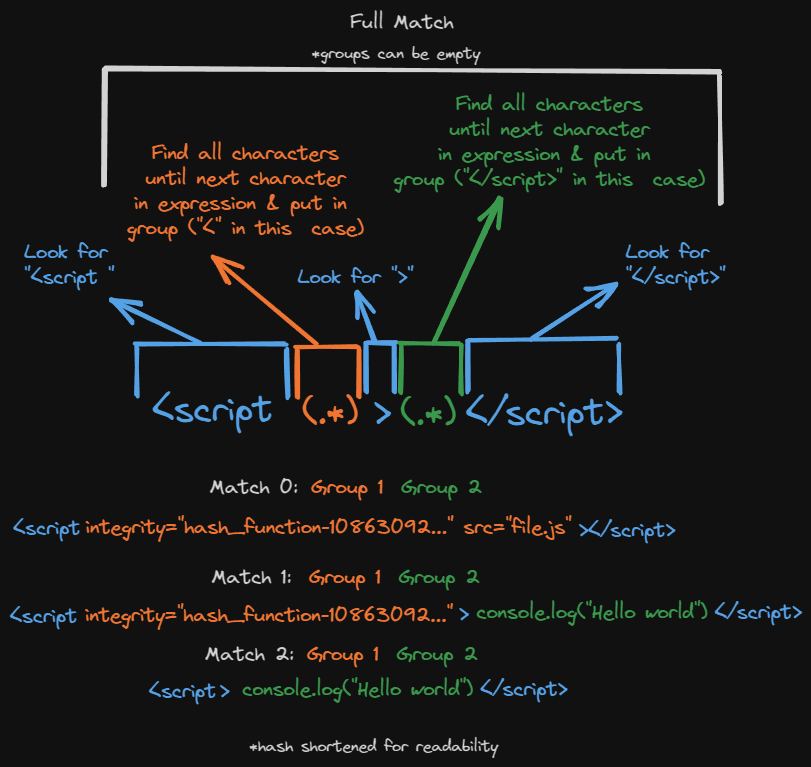
pattern = r"<script (.*)>(.*)</script>"
The r in front just means raw text. Regex uses characters that python sometimes interprets as different meanings, the r just means “no this is all just plain text, don’t do anything fancy with it. If we look at the pattern, it almost looks like regular HTML, just with weird (.*) in it. The (.*) means match any number of characters until the thing that comes after, and put them into a group. If we looked at html like:
<script integrity="hash_function-10863092770407275780296754544299212800001234567891111111111222222222233333333334444444444555555555566666666667777777777888888888" src="file.js"></script>

<script integrity="hash_function-10863092770407275780296754544299212800001234567891111111111222222222233333333334444444444555555555566666666667777777777888888888">console.log('Hello World')</script>

<script>console.log("Hello world")</script>
We see 2 distinct cases. In the first we have a script tag with attributes, no inner content, and a src file, in the second we see inner content, attributes and no src, and in the third we see no attribtues at all, and just inner content. So we want 2 sets of information:
- The attributes (which includes a src if it’s provided)
- The inner content
So our <script (.*)> says, look for the text "<script " then put everything that comes afterwards until the > into a group (the parethesis () indicate a group). This group would be our attributes, and then the (.*)</script> says all the content after the opening tag and until the end tag will be placed in a second group (our inner content).
Regex can do a lot of cool stuff, and you can see a great intro here, but for us I used regex101 to generate our code and modified it from there. The basics would be:
import re
regex = r"<script (.*)>(.*)</script>" # Pattern used to find info

text = "" # Some text to test with

matches = re.finditer(regex, text, re.MULTILINE)

for match in matches:
    attributes = match.group(1).split(" ")
    inner_content = match.group(2)
Where each match in the loop is a new <script> tag, and group(1) is our first match groups (the raw attributes), and group(2) is our inner content. From here we then split the attributes up, and pull out the ones we need, and for each tag we put it’s info into one of our HashTables:
def get_script_tag_information(text:str) -> List[HashTableImproved]:
    # Parses HTML input and returns details about the script tags inside
    matches = re.finditer(regex, text, re.MULTILINE)
    results = []
    for match in matches:
        attributes = match.group(1).split(" ")
        src = ""
        integrity_hash = ""
        integrity_scheme = ""
        inner_content = match.group(2)

        if "src" in match.group(0):
            for attribute in attributes:
                if "src" in attribute:
                    src = attribute.split("=")[1].replace("\"","").replace("'","")

        if "integrity" in match.group(0): # Integrity exists in the tag
            for attribute in attributes: # Search for the integrity attribute
                if "integrity" in attribute:
                    integrity_string = attribute.split("=")[1].replace("\"","").replace("'","")
                    integrity_scheme, integrity_hash = integrity_string.split("-")
                    break

        # Store information about tag to a hash table
        current_tag_info = HashTableImproved()
        current_tag_info["src"] = src
        current_tag_info["integrity_scheme"] = integrity_scheme
        current_tag_info["integrity_hash"] = integrity_hash
        current_tag_info["inner_content"] = inner_content

        # Store hash table in results list
        results.append(current_tag_info)
    return results
Now we have our tag info we go back to our check_input_integrities() function and the remaining lines are:
for tag in tags: # Check each tag's integrity
  if tag["integrity_scheme"] and tag["integrity_hash"]: # Has a hash and listed integrity scheme (hash function)
      if tag["src"]: # If tag pulls from a js file
          check_tag_integrity(tag["integrity_hash"], file_location=tag["src"])
      else: # If tag is inline JS
          check_tag_integrity(tag["integrity_hash"], inline_js=tag["inner_content"])
So let’s look at check_tag_integrity():
def check_tag_integrity(tag_integrity_hash:str, tag_integrity_hash_function:callable=hash_function, file_location: str="", inline_js:str =""):
    # A function to check the integrity of an individual script tag
    if file_location:
        with open(file_location, "r") as src_file:
            file_integrity = tag_integrity_hash_function(src_file.read())
        if not str(file_integrity) == str(tag_integrity_hash):
            raise ValueError(f"File {file_location} content does not match the integrity hash provided")
    else:
        js_integrity = tag_integrity_hash_function(inline_js)
        if not str(js_integrity) == str(tag_integrity_hash):
            raise ValueError(f"Provided inline JS does not match integrity hash:\n{inline_js}")
Everything here is relatively straightforward, except maybe the tag_integrity_hash_function parameter. In python you can pass functions as objects, this is handy because you can have a function run other functions whenever you want. Since we only allowed 1 scheme in our integrity hash checker, we don’t need to override this. But let’s say a tag used the python default hash() function, we could replace the parameter with this function, and it would be used to check, instead of hash_function()
Conclusion
So in less than 300 lines of code we managed to implement a hash funciton, a hash table, integrity hash checking, and a password system. Hopefully this helped make hashing seem a bit less magical, and gave you some interesting use cases to dive deeper on!