AI has hit the world hard in the last few years. Particularly with the introduction of newer generative AI systems like LLM’s (Large language models like ChatGPT, Bard, Llama), and image generators (like Midjourney, DALL-E-2, Imagen etc.). These systems make it feel like you can create anything you want with them.
While they’re very useful many people are worried about using tools produced by the various companies creating them. Whether it’s data in a question that’s confidential , or wanting to avoid vendor lock-in , to just wanting to avoid rights problems with the images there’s lots of reasons to want to run these models locally. So today, we’re going to do just that!
This article is not a very technical one, it’s practical. This article will teach you how to get these up and running with some easily available tools. If you’re interested in the theory of how these models are built, or specifics of under-the-hood operations, I would look for other resources (linked throughout and at the end). So with that being said, let’s look at how to get started with our own AI on our machine!
Hardware
Before we get started it’s important to note that any of these AI’s will need powerful hardware. I will list specifics in relevant sections, but if you are looking to do this with a low-power device, most of these solutions won’t work well.
LLM’s
Large language models are AI systems that let you have a conversation in plain english. Asking questions you might ask a co-worker or buddy, and getting responses that feel more informed than both in response. These are great tools for getting code snippets, having concepts explained to you, cheating on essays (don’t do this), etc. The most popular of these being ChatGPT, Bard, and Llama.
If you’ve ever wanted a personal assistant to help you write stuff, LLM’s are often your best bet!
Ollama
Ollama is an open source project designed to make setting up LLM’s on your computer easy. While it won’t let you run Chat GPT, it will let you run the state-of-the-art open source offerings including Llama 2 , Mistral, and orca-mini.
Installation
The installation is a bit different depending on your operating system:
- For MacOS just head to the download page and install the app
- For linux you can just head to the download page and run the command (as of writing it’s
curl https://ollama.ai/install.sh | sh), which will run install.sh for you, and set everything up - For windows you will need to setup wsl, this will let you run a mini linux machine on your windows PC, from which you can then run the linux install command above. Just make sure you run the command inside WSL (run
wsl first to get into WSL, then run the command)
If you have docker there is also an official docker image you can use.
Usage
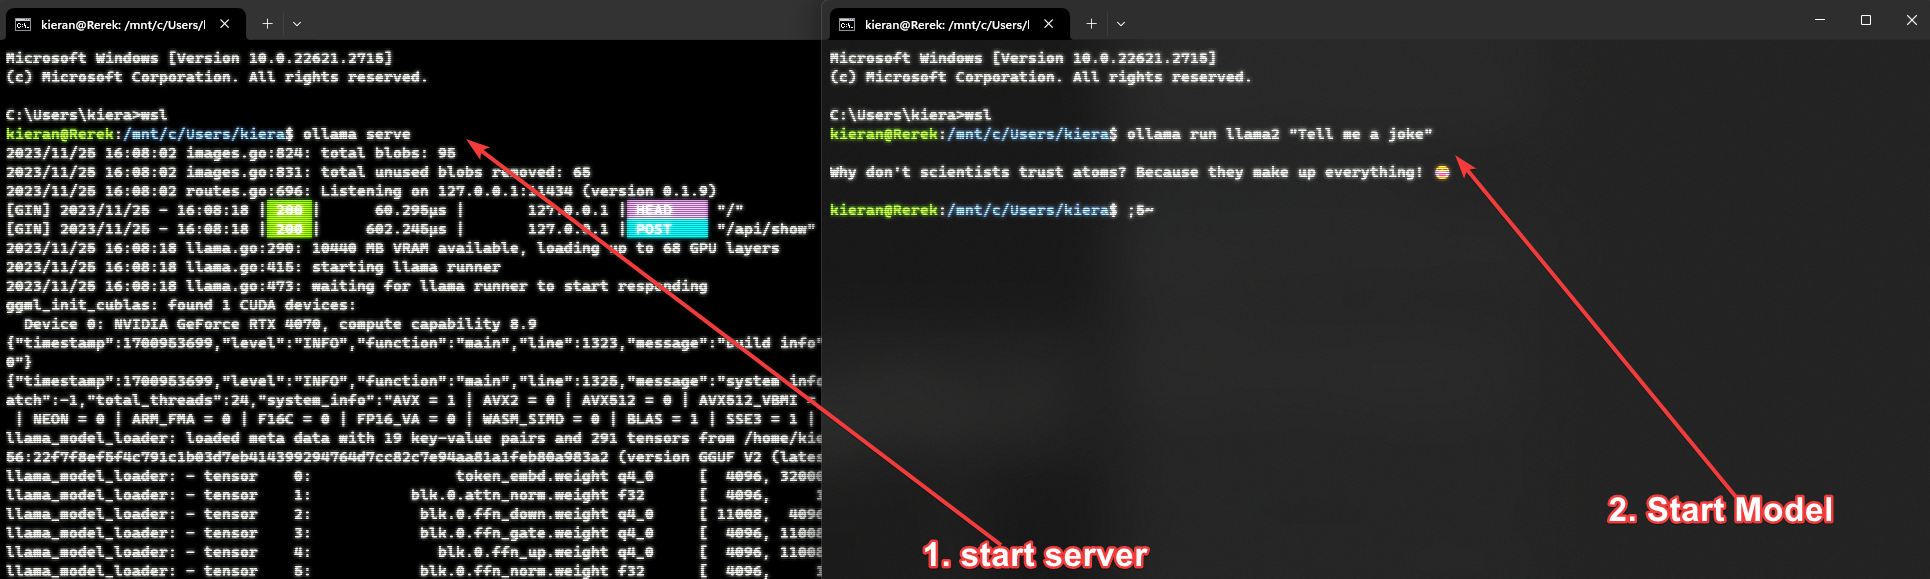
To use Ollama there are 2 parts, the server and the model. The server is what allows you to run the model, and then the model is what you run on the server. Once you have Ollama setup you will need to open the app (if on mac), or run ollama serve on linux (or inside wsl on windows). This will start the server
To run a model and actually use Ollama we first need to pick an available model. For now we will just use the basic llama2 model. Specifically we will use the 7b version, this version requires 8GB of RAM, and it’s recommended to use an NVIDIA GPU that’s an RTX 2060 or newer. You can get away without a GPU, but your responses will be slow.
So to actually run the model there’s a few options to do this (you will need to open a second terminal for linux/windows to do this):
- If you only have 1 prompt you want to give; Use
ollama run <model name> "<prompt>". This will install the model if you don’t have it, run the prompt and print the result - If you want a conversation; Use
ollama run <model name> and then you will be prompted once everything is setup to chat, and you can continue the chat as long as you want
So if you wanted to run llama2 you can run ollama run llama2, then give it prompts. For any model on the ollama library you can check the tags for other versions. For example with llama2 there’s a 7b, a 13b and a 70b version, as well as some other flavors. Each will have their own hardware requirements. For example to use the 13b variant you can run ollama run llama2:13b.
Here is what it would look like on a windows machine (you don’t need wsl on linux/macos):
Running the web server
If you run ollama serve, and then leave a model running you will get a message in the terminal running the server with a URL you can go to. In the terminal window that has ollama serve running, you can go and run a server (i.e. ollama run llama2), and you will see a message saying llama server listening at http://127.0.0.1:<PORT>. You can then head to that location to work with ollama over the web:
While this works, the UI kinda sucks. There’s a ton of options that the ollama team suggests in their readme file, the nicest looking I’ve found is ollama webui. To run this you will need to install docker, then run the command in their readme (as of writing the command is docker run -d -p 3000:8080 --add-host=host.docker.internal:host-gateway --name ollama-webui --restart always ghcr.io/ollama-webui/ollama-webui:main). This will start the web ui at http://localhost:3000:
Image Generative AI’s
Image generation is an incredibly popular use for AI. Many people argue it helps to democratize art and make it easy for people to realize their ideas. Like other forms of ai they come with their fair share of controversies , but the results are undeniably useful. We will be going through and showing you a few options. There are some options we will not look at, but might be worth looking at down the road (such as Comfy UI). It’s also important to note this is a relatively new (to the public) technology, and so there may be better tools to look out for in the future.
The two tools we will look at are Fooocus and Invoke AI. I would recommend Foocus for simple use, and generally it “just works”, if you want to learn more and/or have more granular control I would look into Invoke AI.
Fooocus
Fooocus is one of the easiest to use image generators. It’s a free and open source system that is based on Juggernaut. There are also 2 additional Models that can be run separately designed for photorealism and anime (yes I’m also dissapointed).
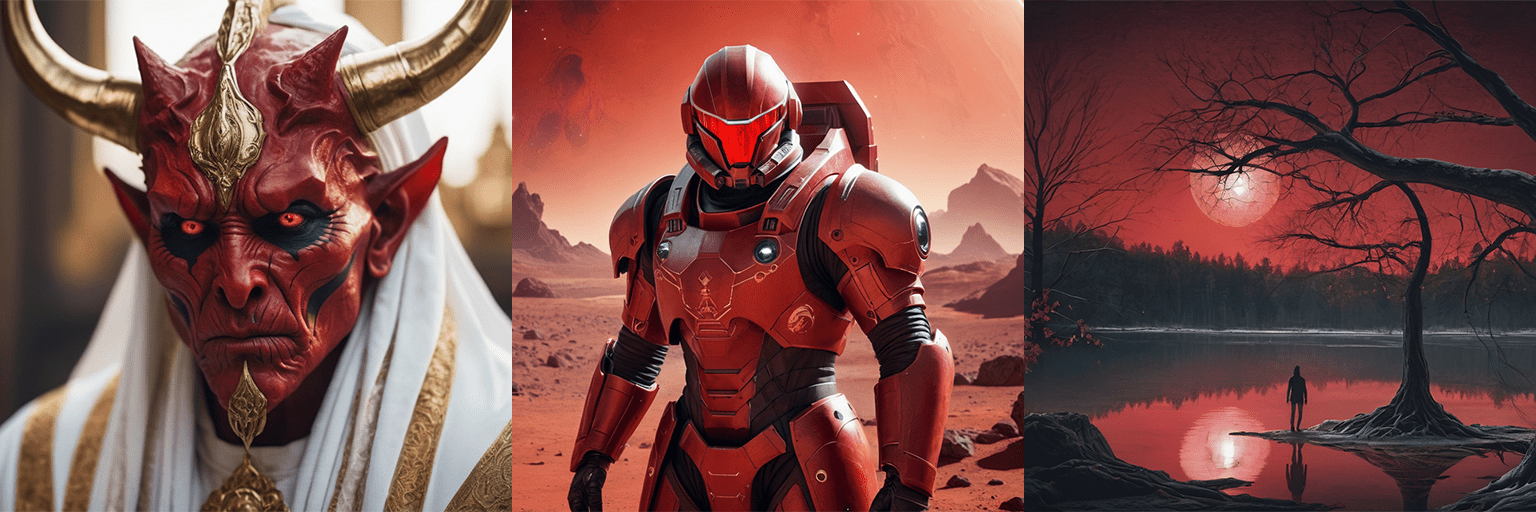
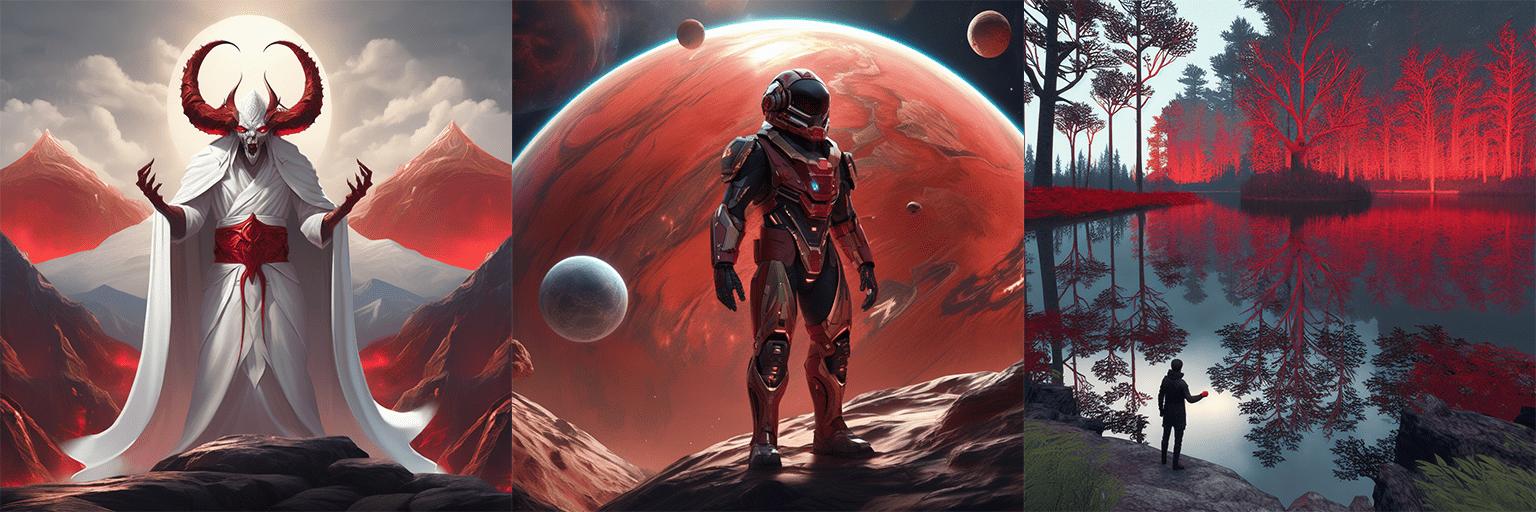
Here is an example of a few images generated using Fooocus, which we will show you how to setup (keep in mind these are compressed versions):
Installation
Before installing make sure you have at least 16GB of RAM, ~30GB of disk space, and a GPU with at least 4GB of VRAM. All images as examples were done on a system with an RTX 4070 and 32GB of RAM. You will also need to install python 3.10 regardless of your OS. Installation is relatively simple, I would recommend checking their guide.
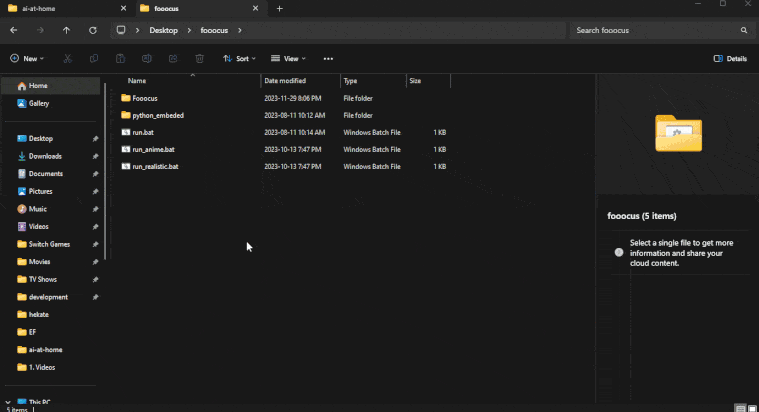
For windows you just download the zip and run run.bat which will set everything up.
For linux/macos you will need to run the following commands:
git clone https://github.com/lllyasviel/Fooocus.git
cd Fooocus
python3 -m venv fooocus_env
source fooocus_env/bin/activate
pip install -r requirements_versions.txt
Usage
For windows simply use run.bat (or the realistic or anime alternatives), for linux/macos you need to activate your venv and then run the python file:
source fooocus_env/bin/activate
python entry_with_update.py
You can pass --preset realistic for the realistic model, and --preset anime to run those specific models on linux/macos
You can then access the web interface at http://localhost:7865/
Additional examples
Here are some additional examples using all the default settings:
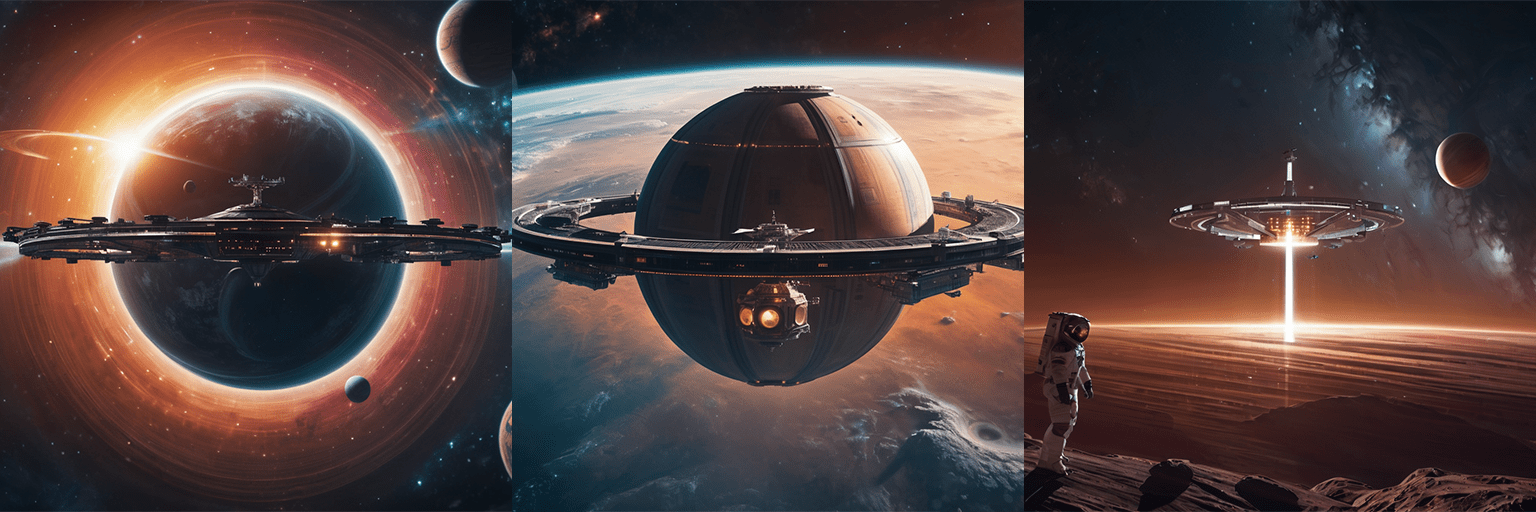
Prompt: Space station orbiting a planet with dust rings and a nebula in the background
Style: Fooocus V2, Fooocus Sharp, Fooocus Photograph, Fooocus Enhance, Fooocus Cinematic, MRE Surreal Painting, SAI Fantasy Art, MRE Space ART
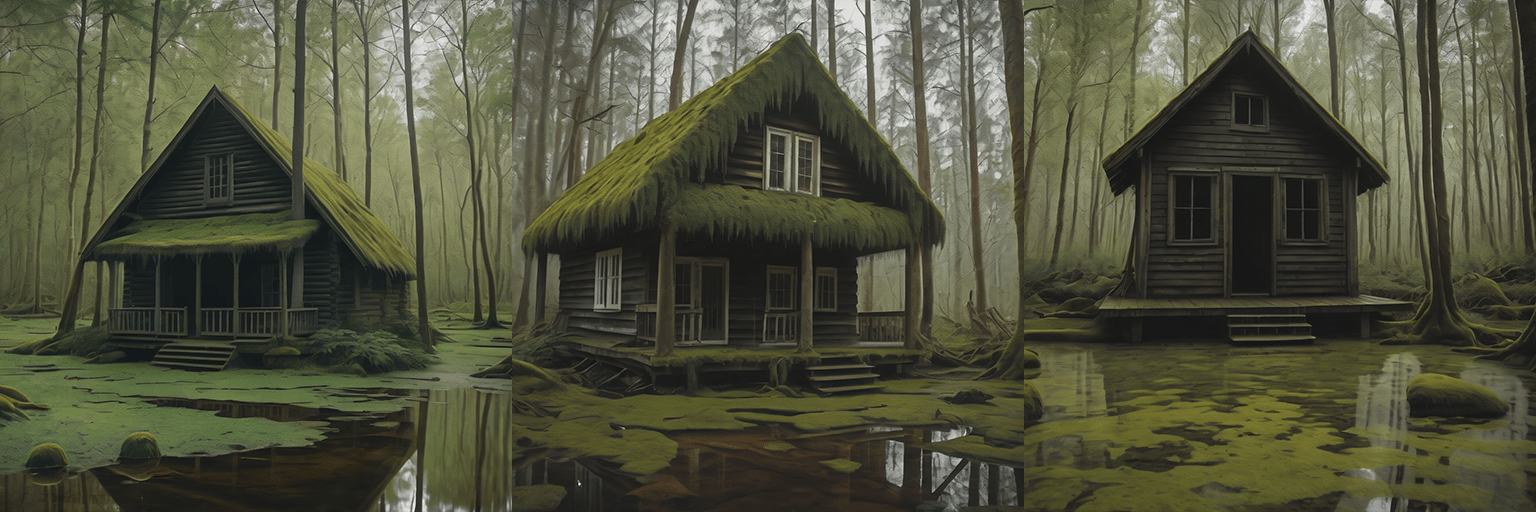
Prompt: Spooky wood cabin with moss overgrown in a swamp
Style: Fooocus V2, Fooocus Sharp, Fooocus Photograph, Fooocus Enhance, Fooocus Cinematic, Misc Horror, MRE Gloomy Art, Dark Moody Atmosphere

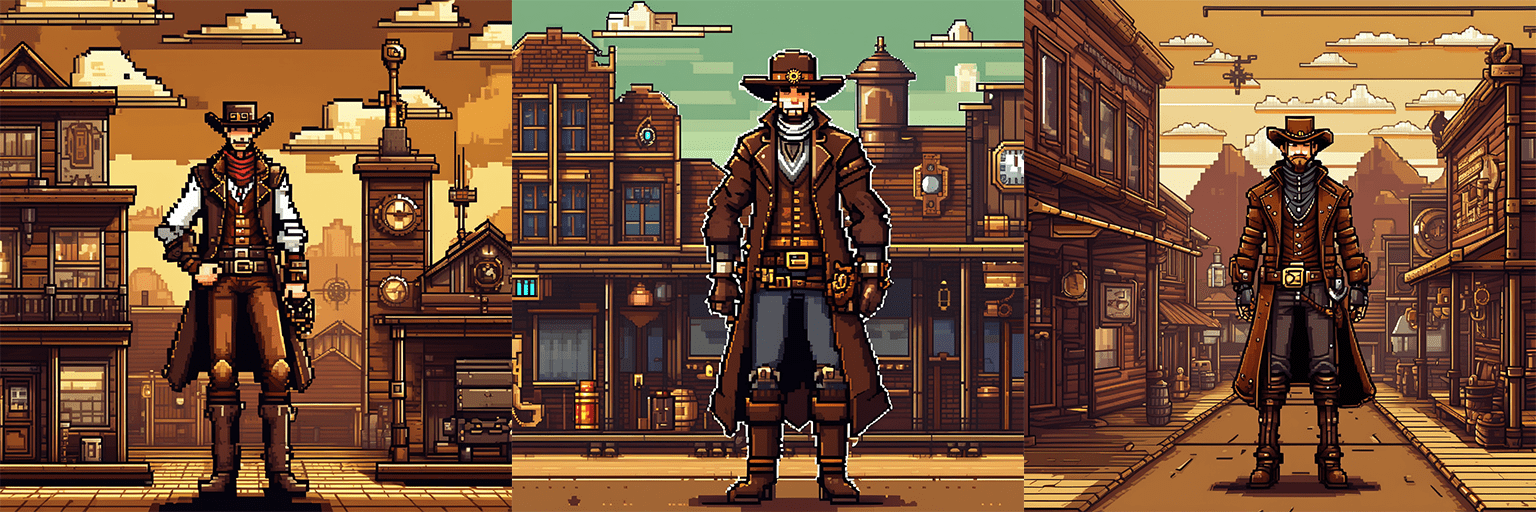
Prompt: A steampunk cowboy in a western town pixel art style
Style: SAI Pixel Art, Artstyle Steampunk
Because it was available I decided to test the anime optimized model as well:
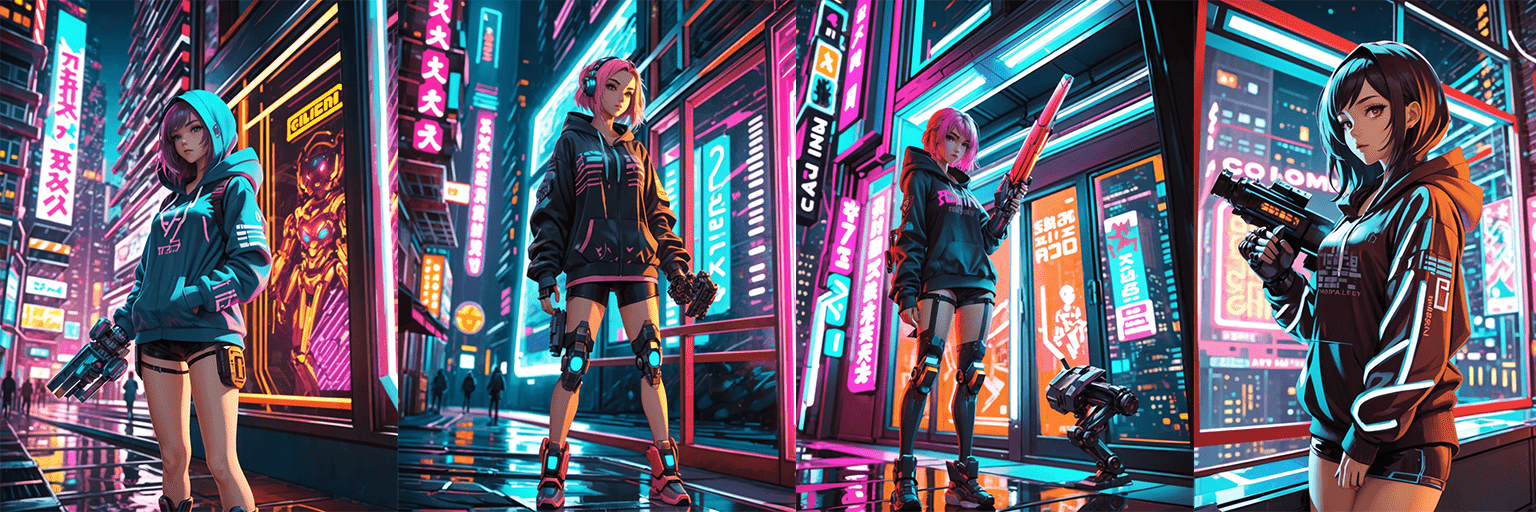
Prompt: Girl with robot arm in a hoodie in front of a window at night in a city
Style: Fooocus V2, SAI Anime, SAI Digital Art, SAI Enhance, Futuristic Cyberpunk Cityscape, Game Cyberpunk Game
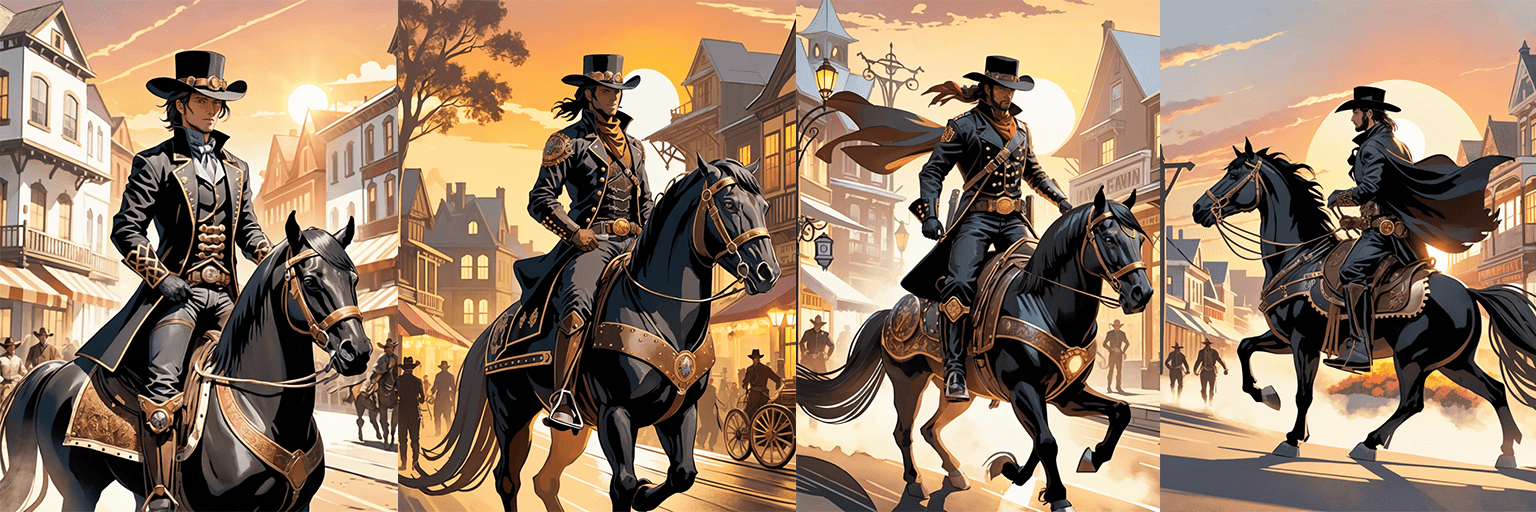
Prompt: Cowboy on a black horse in a town with the sun setting behind them
Style: Fooocus V2, SAI Anime, SAI Digital Art, SAI Enhance, Artstyle Steampunk, Steampunk 2
Invoke AI
Invoke AI is a more configurable image generation system that gives you more manual control. Here is an example of a few images generated using invoke ai, which we will show you how to setup (keep in mind these are compressed versions):
Before we bother getting started the requirements to run the software are very high. You can find them here, but the basics are that you will need a LOT of RAM, and a powerful GPU. You will also need quite a bit of disk space ~100GB at minimum. This is not something that most laptops can run unfortunately.
invoke AI is a framework for running image generation models and has support for many of the great open source ones (like stable diffusion and openjourney).
Installation
In order to run invoke you will first need to install python 3.10+. As of writing there is an ongoing bug that means you will need to install either python 3.10 or 3.11 but not 3.12 this bug might be fixed by the time you’re reading. Download python for your system, and then there is an automated installer you can run. Follow the steps outlined in their documentation.
Configuration
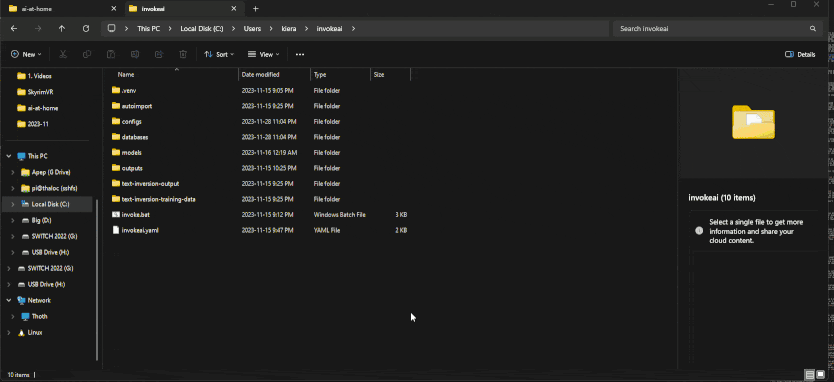
Once you have installed invoke using the automated installer you can go to it’s install location and run invoke.bat (windows) or invoke.sh (macos/linux). By default it will install the standard stable diffusion models, if you want to install more run the script and then enter 5 at the menu. From there you can select which models to install, then select “Apply changes and Exit”:
Usage
You can run invoke very similarly to configuring it. Go to Invoke’s install location and run invoke.bat (windows) or invoke.sh, then hit enter (or type 1 and hit enter). This will open the web UI and you can interact via the website that will be launched (at http://localhost:9090):
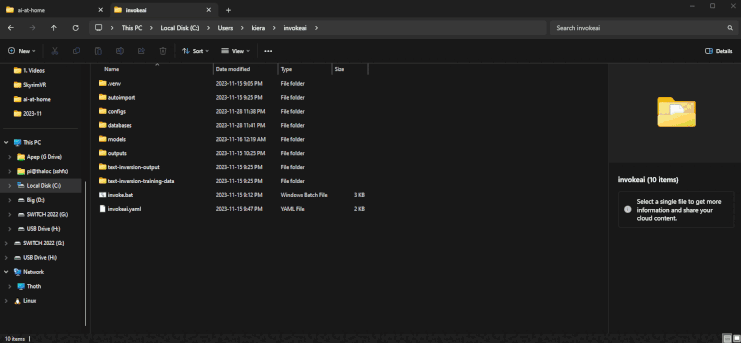
Image generation is a bit more finicky and complicated than text generation. Instead of trying to explain what all the knobs and dials do, I would suggest looking at the invoke AI resources that are actually quite useful for learning (especially their youtube channel).
Examples
Invoke AI is a bit more difficult to use than foocus, but it does work well, all the below examples were using sdxl:
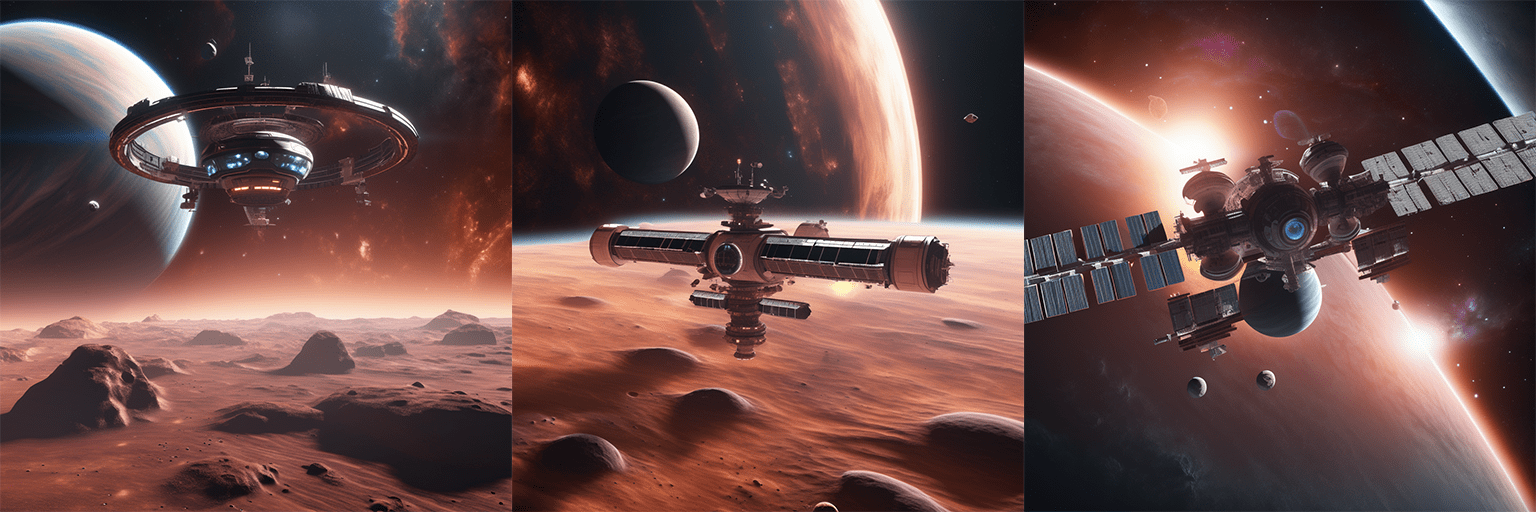
Prompt: Space station orbiting a planet with dust rings and a nebula in the background
Positive Style: photorealistic, bright, vivid colours, nature, intricate, highly detailed, artstation, concept art, sharp focus, unreal engine 5, 8 k
Negative Prompt: out of frame, duplicate, watermark, signature, text
Negative Style Prompt: city, electronics
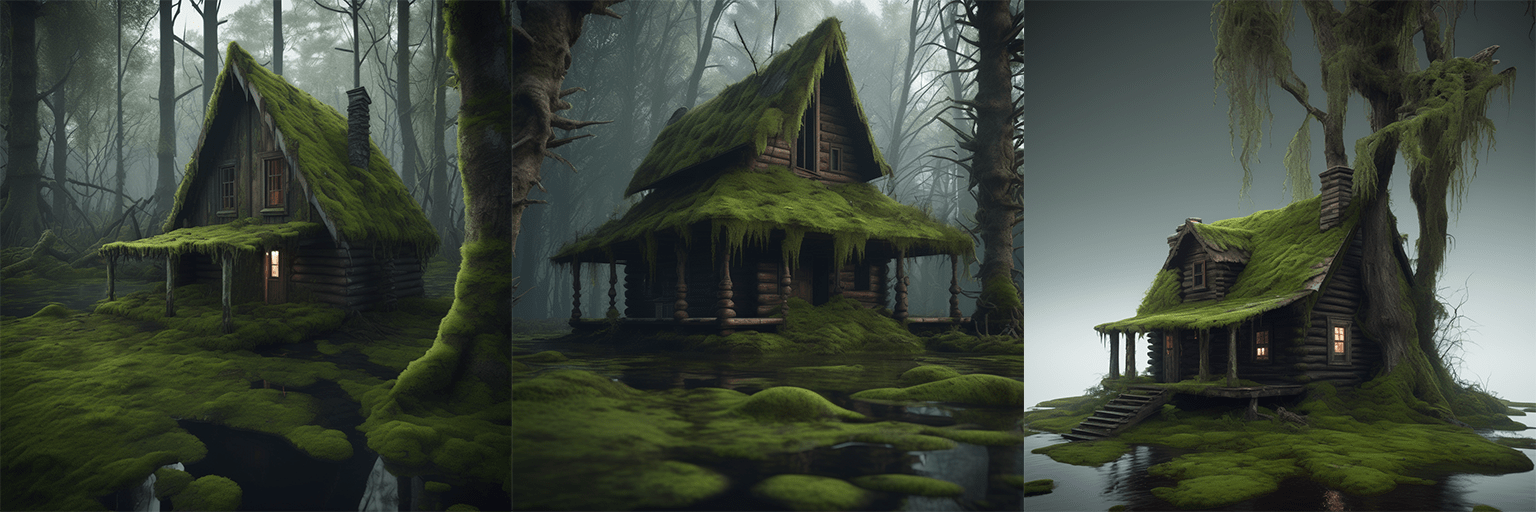
Prompt: Spooky wood cabin with moss overgrown in a swamp
Positive Style: photorealistic, dark, gloomy, nature, water, intricate, highly detailed, artstation, horror, concept art, sharp focus, unreal engine 5, 8k
Negative Prompt: out of frame, duplicate, watermark, signature, text
Negative Style Prompt: city, electronics
SDXL can be a bit finicky, but sometimes there are combinations of prompts that work really well. You can find examples of these sorts of prompts here:
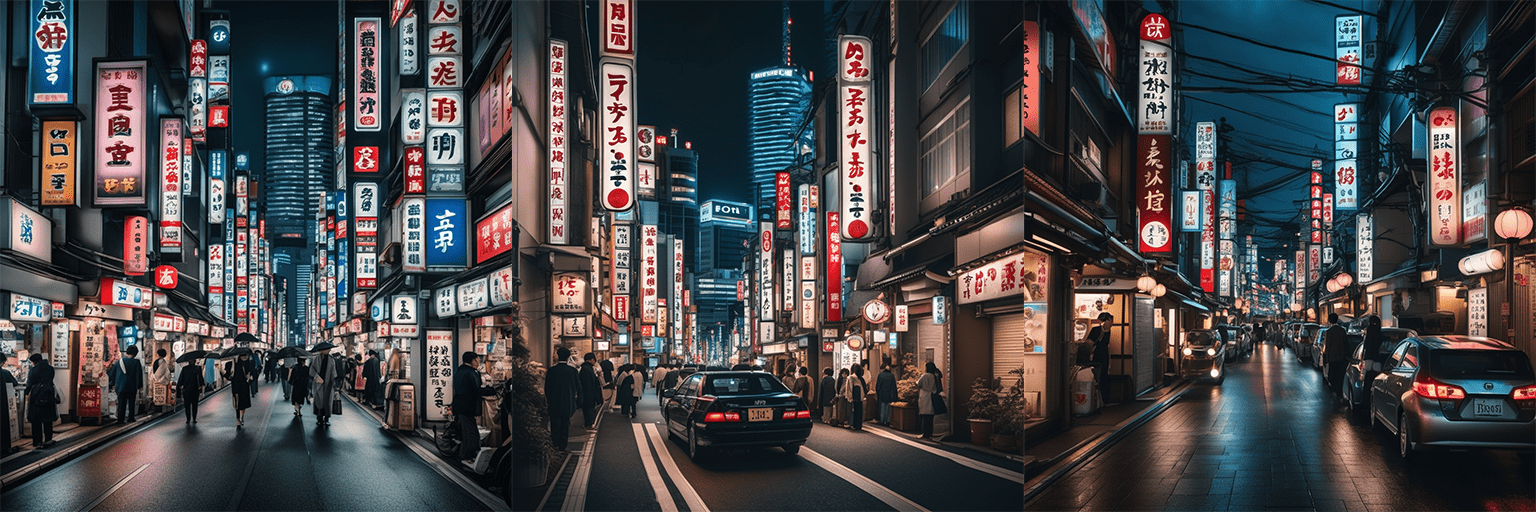
Prompt: breathtaking night street of Tokyo
Positive Style: neon lights. award-winning, professional, highly detailed
Negative Prompt: sunlight
Negative Style Prompt: anime, cartoon, graphic, text, painting, crayon, graphite, abstract glitch, blurry
As we can see SDXL does not do as well with pixel art and some other styles…
Prompt: A steampunk cowboy in a western town pixel art style
Positive Style: pixel art, steampunk, noon, western, hard lines, clean lines
Negative Prompt: out of frame, duplicate, watermark, signature, text
Negative Style Prompt: nature, blury
Additional resources about AI
We looked at running these models today, but if your curious to learn more about how they work there’s plenty of literature about the various different models. There’s often more than 1 approach taken, and each model is implemented a bit differently. Additionally these are complex systems, understanding them in technical detail takes a while (I still only barely understand a lot of it). I will try to include details about some popular models, and some of the models used in the systems written about here.
Here are some suggestions for reading (some beginner, some more advanced):
There’s also some other projects in and around AI systems that can be useful:
References